Managing & customizing containers
This page is written to help users of all skill levels make the most out of Docker containers on Unraid OS. The tips and best practices come from the Unraid team, who ensure they are tailored to most users' needs. However, keep in mind that Docker is constantly evolving, so for the most up-to-date features, advanced configurations, or troubleshooting issues that go beyond what Unraid covers, it's always a good idea to check the official Docker documentation.
Before customizing a Docker container in Unraid, it’s helpful to understand the basic configuration options. Each container template provides a user-friendly interface for setting up networking, storage, and environment variables, allowing you to tailor the container's behavior to your needs without using complex command-line tools.
- Network type
- Volume mappings
- Port mappings
- Environment variables
Unraid supports several Docker network modes. The network type you choose determines how your container communicates with other devices and containers:
-
Bridge (default): The container is placed on an internal Docker network. Only ports you explicitly map will be accessible from your Unraid server or LAN. This is the safest and most common option for most applications.
-
Host: The container shares the Unraid server’s network stack. It can use any available port, but you must ensure no port conflicts with other services. Use this mode only if the application requires direct network access.
-
None: The container has no network access. Use this for isolated workloads that do not require any network connectivity.
-
Custom (macvlan/ipvlan): The container is assigned its own IP address on your LAN, making it appear as a separate device. This is useful for advanced scenarios but may require additional configuration in your network environment.
The default network type specified in the container’s template is recommended for most users.
Docker has a limitation that prevents it from participating in two networks that share the same subnet. If you switch between a wired and a wireless connection, you will need to restart Docker and reconfigure all existing containers to use the new interface. This network configuration change requires container reconfiguration.
Volume mappings control how your container accesses files on your Unraid server. Each mapping links a folder inside the container (container path) to a folder on your Unraid server (host path).
- Container path: The directory inside the container (e.g.,
/configor/unraid_media). - Host path: The directory on your Unraid server (e.g.,
/mnt/user/appdata/myapp). - Access mode: Controls permissions - read-only or read/write. Use the most restrictive mode that still allows the container to function.
Store application data (settings, libraries, etc.) outside the container, typically in the appdata user share. This share management approach keeps your data safe during updates or reinstalls.
- Paths are case-sensitive.
- Container paths should start with a
/. - If using an unassigned device as the host path, set the access mode to a "Slave" option to ensure proper detection.
- Host paths are created automatically if they do not exist when the container starts.
- Unexpected folders appearing on your server may indicate a misconfigured mapping.
Port mappings determine how network traffic is routed from your Unraid server to the container.
-
Bridge network: You can map internal container ports to different host ports. For example, if three containers use port 8000 internally, you can map them to 8000, 8001, and 8002 on the host.
-
Host network: The container can use any available port. Avoid running multiple containers with the same port to prevent conflicts.
Only modify the host port value. Do not change the container port unless you know the application supports it.
Most templates provide sensible defaults, but you can add or adjust port mappings.
Environment variables can customize how your Docker container behaves at runtime. They allow you to pass key-value pairs that your containerized application can read and utilize.
Common uses for environment variables
- Setting the time zone
- Configuring user and group IDs
- Specifying language preferences
- Adjusting application-specific settings, like API keys or feature toggles
Managing environment variables in the WebGUI
- You can add, edit, or remove environment variables in the container's configuration screen through the WebGUI.
- Many container templates come with common environment variables that are already set, but you can always add more if needed.
- Be sure to check the specific application’s documentation to know which environment variables are available and which values are valid.
TZ=America/New_York: This sets the container's time zone.PUID=99andPGID=100: These set the user and group IDs for file permissions.UMASK=022: This controls the default file permissions for created files.API_KEY=your_api_key_here: This could be used by an application for authentication with an external service.
Use environment variables to avoid hardcoding sensitive or environment-specific information inside your container images. This practice enhances the portability and security of your containers.
Creating and starting containers
Once you've configured your container’s network, volume mappings, port mappings, and environment variables, you're ready to create and launch your Docker container. This section will guide you through the creation process, explain how to manage startup order and dependencies, and provide tips for advanced startup customization.
Creating a container
After reviewing your configuration settings in the container template:
- Click Create to begin downloading and setting up the container.
- Avoid closing your browser window or navigating away until the process completes.
- The initial download for a new repository may take longer than subsequent downloads.
- Once the process is finished, click Done to return to the Docker page, where you can manage or add more containers.
Planning your startup sequence
Some containers depend on others to function correctly. For example, an application might need a database container running first, or a service might require a VPN container to be active before it starts.
- Identify containers that provide core services (like databases, VPNs, or storage gateways).
- Ensure dependent containers are started only after their prerequisites are running and ready.
- Review documentation for each container to understand any specific startup requirements.
Advanced container startup
Unraid gives you flexible control over which containers start automatically and in what order. This is especially useful if you have containers that depend on others (such as a database or VPN service).
To ensure a container starts automatically when the array starts:
- Go to the Docker tab in the WebGUI.
- Toggle the Auto-Start switch to ON for each container you want to launch automatically.
Customize startup order and delays
By default, Unraid starts all auto-start containers as quickly as possible, in the order they appear on the Docker tab. You can customize this order and add wait times between container startups:
- On the Docker tab, unlock the container list using the padlock icon.
- Drag and drop containers to rearrange their order.
- Switch to Advanced View using the toggle at the top right.
- In the AutoStart column, enter a wait time (in seconds) in the wait field for any container that needs extra time before the next one starts.
- Use trial and error to determine the best wait times for your setup.
Setting the correct order and wait times is especially important for containers that depend on services provided by others (for example, starting a database before an app that uses it, or a VPN before dependent apps).
Testing your startup sequence
While Unraid does not have a dedicated "test startup sequence" feature, you can simulate and verify your startup order:
- Stop all containers from the Docker tab.
- Start each container manually, in your planned order, using the Start button.
- Monitor container logs and application behavior to ensure dependencies are met and services initialize as expected.
- Adjust the startup order or wait times as needed.
Test your startup sequence after changing container dependencies or adding new services, especially if your setup relies on specific startup timing.
Controlling your containers
Once you've created and started your Docker container, managing it is easy through the WebGUI. This guide will walk you through using the context menu, understanding container health indicators, and accessing volume mappings within your container.
To access the container's context menu, go to the Docker or Dashboard tab and click on the container icon you want to manage. This menu offers straightforward access to common actions:
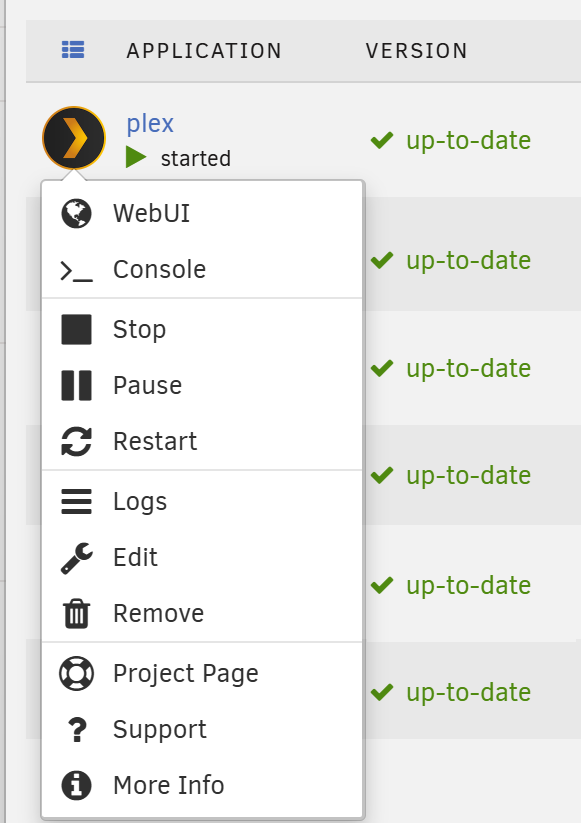
| Option | Description |
|---|---|
| WebUI | Opens the container's web interface in a new browser tab (if available). |
| Console | Opens a command-line interface to interact with the container directly. |
| Stop | Stops the running container. |
| Pause | Pauses the container, temporarily halting all processes. |
| Restart | Restarts the container, applying any configuration changes. |
| Logs | Shows the container's log output for troubleshooting. |
| Edit | Change container settings, such as port or volume mappings. Changes apply immediately after saving. |
| Remove | Deletes the container. You can choose to remove just the container or also delete its image. |
| Project Page | Opens the container's project page for documentation and support. |
| Support | Provides access to support resources and help for the container. |
| More Info | Displays additional information about the container and its configuration. |
Health indicator
You will find a colored health indicator next to each container’s icon:
- 🟢 Healthy: Indicates that the container is running and responding as expected.
- 🟡 Unhealthy: The container is running but has failed its health check. Investigate the logs or container settings for more information.
- ⚪ No health check: This means no health check is configured for the container. It's common for many apps, and not necessarily a problem.
Health checks are defined by the container author and may not be present for all images.
Volume mappings inside a container
When configuring your application through its web interface, reference the container path you set up during configuration - not the host path.
For instance, if you mapped /mnt/user/media on the host to /unraid_media in the container, you should use /unraid_media in the application’s settings.
Example scenarios
Here are some examples showing common path mapping configurations that users frequently need when setting up Docker containers. They demonstrate how to translate between Unraid's host file system paths and the container's internal paths, helping you configure applications correctly.
-
Media server: Host path:
/mnt/user/media
Container path:/unraid_mediaIn the app, set your media library location to
/unraid_media. -
Appdata storage: Host path:
/mnt/user/appdata/myapp
Container path:/configIn the app, use
/configfor configuration storage. -
Multiple user shares: Host path:
/mnt/user/media→ Container path:/media
Host path:/mnt/user/data→ Container path:/dataReference
/mediaor/datain the application as needed.
Always use the most restrictive access mode (read-only or read/write) that allows your container to function properly.
Scheduling start and stop
Unraid does not natively support scheduled start or stop actions for Docker containers, but you can easily automate this process using the User Scripts plugin. This powerful tool allows you to run custom scripts on a schedule, enabling automatic control of your containers.
User Scripts plugin
The User Scripts plugin allows you to create, manage, and schedule custom shell scripts directly from the WebGUI. You can use it for various automation tasks, such as starting or stopping containers, backing up data, or running maintenance routines.
- Install the plugin from the Apps tab if you haven’t done so already.
- Access it via Settings → User Scripts to create and manage your scripts.
To learn more about plugins, check out Plugins.
Scheduling container actions
To automate the start or stop of your containers on a schedule:
- Install the User Scripts plugin from the Apps tab.
- Navigate to Settings → User Scripts.
- Create a new script for each unique schedule. You can include commands for multiple containers in a single script if they share the same schedule.
- Set the schedule using the dropdown menu or use a custom
cronexpression for more advanced timing options. - Click Apply to save and activate your script.
Cron expressions enable flexible scheduling beyond the built-in options. For example, 0 3 * * 1 runs your script at 3:00 AM every Monday.
Command examples
- Start container
- Stop container
- Restart container
- Check container status
- Show container logs
To start a container, use the command:
docker start "container-name"
Replace "container-name" with the actual name as shown on the Docker tab.
To stop a container, use the command:
docker stop "container-name"
Replace "container-name" with the actual name as shown on the Docker tab.
To restart a container (useful after updating configurations or troubleshooting):
docker restart "container-name"
Replace "container-name" with the actual name as shown on the Docker tab.
To check if a container is running:
docker ps --filter "name=container-name"
This will list the container if it is currently running.
To view the logs for a container (helpful for troubleshooting):
docker logs "container-name"
This displays recent log output for the specified container.
You can find the container name on the Docker tab or by viewing the docker run command in the container's configuration screen.