Set up Frigate on Unraid with object detection and phone notifications
Last validated: October 2026 with Frigate 0.18.2 and Unraid OS 7.4.0-rc.2.
Frigate is a network video recorder that uses local object detection to recognise people, vehicles, pets and other supported objects in your camera footage. Instead of alerting you to every movement, it lets you focus on the activity that matters to you. Video processing and object detection run on your own server.
This guide walks you through recording, object detection, zones and exports, then private access through Tailscale and notifications on an iPhone. Configure your first camera, then repeat the camera settings for the others. Most of the setup uses Frigate's settings interface. Neither MQTT nor Home Assistant is required.
There's a companion video on the Uncast channel if you'd like to follow the setup on screen. The steps and commands you need are included here.
Choose your camera and hardware
Choose cameras that provide supported local video streams. Wired Power over Ethernet (PoE) cameras are a useful choice where you can run cables. Check the exact model's stream support before buying; a camera working in its manufacturer's app does not guarantee third-party access.
This example uses a Reolink TrackMix PoE P720, with a high-resolution main stream for recording and a smaller substream for detection. Other models need their own stream addresses and settings.
The video uses Intel integrated graphics, but an Intel GPU is not required. Choose a supported decoder and object detector for your hardware. These perform different jobs:
| Task | What it does |
|---|---|
| Video decoding | Turns compressed video into frames; a supported GPU reduces CPU work |
| Object inference | Runs the recognition model on a supported GPU, NPU, Coral or CPU |
| Save the main recording stream | Normally a copy of the compressed video, without re-encoding |
| Motion detection, tracking and other processing | CPU and other parts of Frigate's processing pipeline |
You do not need separate accelerators for each job. The optional neural processing unit (NPU) and USB Coral sections replace GPU inference, not video decoding. A Coral does not decode camera video or remove all CPU work. Check Frigate's supported detectors if your hardware differs.
Choose your hardware route
Use this table to find the sections for your hardware. Complete the container setup first, then choose one video decoder and one object detector. The combinations below are starting points, not a requirement to use the same device for both jobs.
| Hardware | Container setup | Video decoding | Object detection |
|---|---|---|---|
| Supported Intel GPU | Intel device mapping | QuickSync or VAAPI | OpenVINO GPU |
| NVIDIA GPU | NVIDIA runtime and driver | NVIDIA decoding | ONNX — advanced model preparation, or a separate detector |
| Supported AMD GPU | AMD device mapping | VAAPI | USB Coral, or OpenVINO CPU for initial testing |
| Intel NPU | NPU device mapping, plus your GPU setup | Your supported GPU decoder | OpenVINO NPU |
| USB Coral | USB device mapping, plus your GPU setup | Your supported GPU decoder | EdgeTPU |
| CPU only, for initial testing | No GPU mapping | Software decoding | OpenVINO CPU |
Skip the hardware sections that do not apply to you. NVIDIA decoding can work with a different detector, so you do not need to prepare an ONNX model just to use that GPU for video.
Prepare the camera
Find the camera in your router's connected-device list or its manufacturer's app. Give it a stable local address, such as a DHCP reservation, and use a unique camera password. Do not forward camera ports from your router to the internet.
For this Reolink model:
- Open the camera in the desktop Reolink Client.
- Open Device Settings → Network → Advanced → Server Settings.
- Enable HTTP, port
80, and RTSP, port554. - Leave ONVIF, port
8000, disabled for the manual Reolink wizard route used here. - Save the changes.
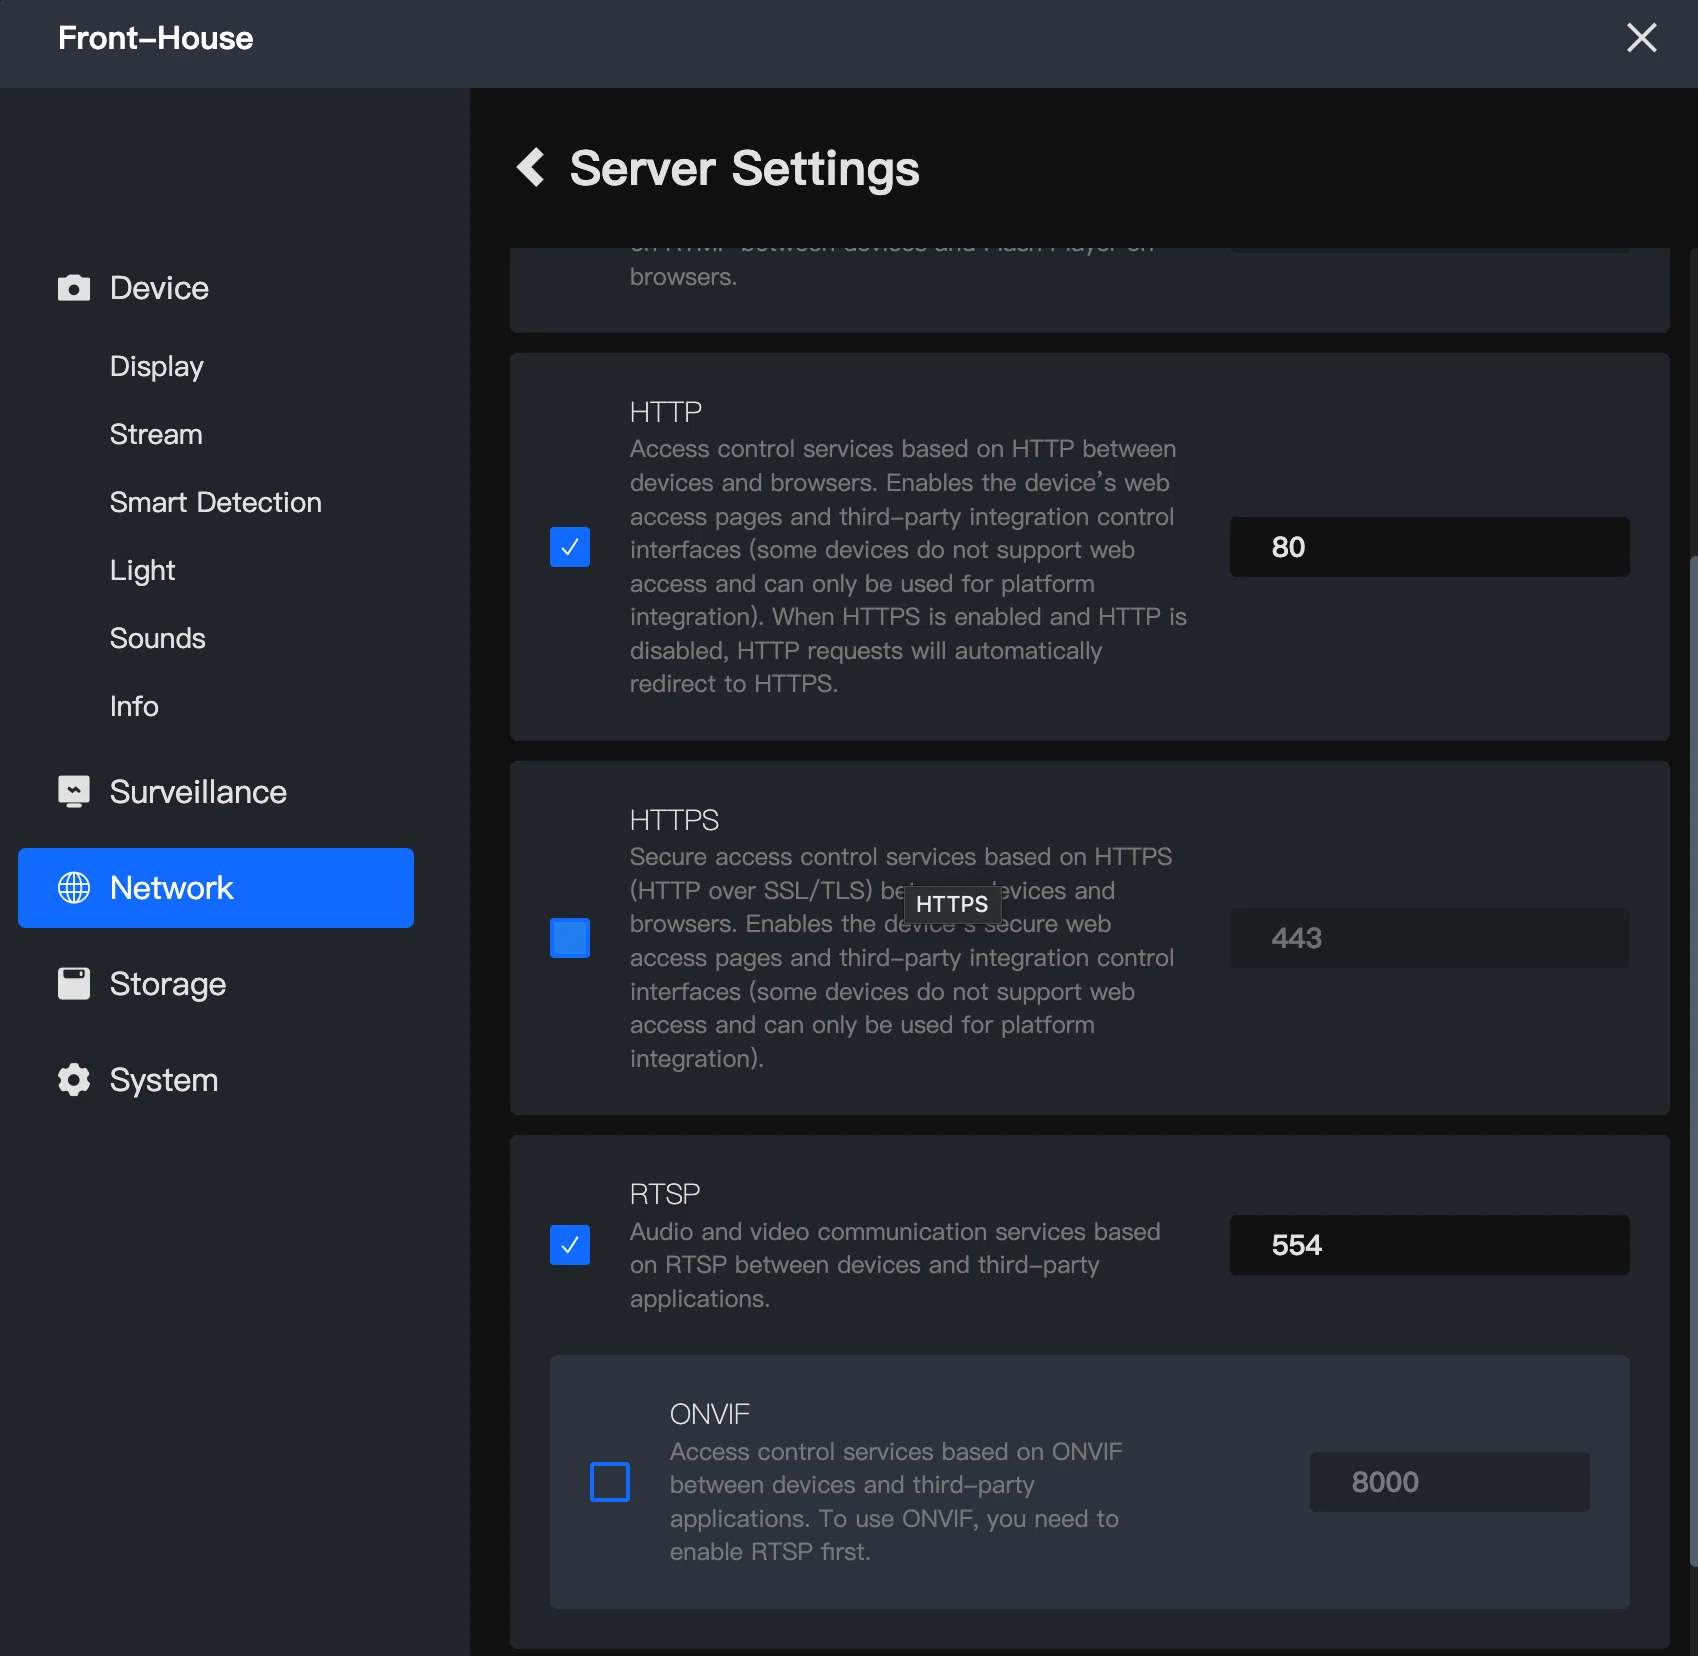
HTTP lets Frigate query the camera's settings. The video connection in this example still uses RTSP. ONVIF is a separate discovery and control interface; enabling it does not automatically configure camera tracking. Menus and requirements vary by camera firmware.
Your camera can keep recording to its own SD card independently. Frigate does not import those recordings: its playback and exports use footage it has recorded itself.
Create the recording share
A dedicated SATA SSD pool is a practical starting point for many multi-camera installations. NVMe is not usually necessary for recording camera streams. Choose capacity, sustained write performance and write endurance for your combined camera bitrate, retention and playback workload.
Recording to the parity-protected array is possible, but sustained writes add parity overhead and disk activity. A dedicated pool keeps that workload separate. Do not format a disk containing data you need. If you intend to create a separate pool, do not add that SSD to the array.
- Create or select a suitable pool in Unraid. If you have not set one up, see the Unraid pool configuration guide.
- Open Shares → Add Share and name it frigate.
- Set Primary storage to your recording pool.
- Set Secondary storage to None (recommended for a dedicated recording pool).
- Click Add Share, or save the settings if editing an existing share.
Keep the configuration in persistent appdata, separate from the recording share:
| Purpose | Example host path | Container path |
|---|---|---|
| Configuration and database | /mnt/user/appdata/frigate | /config |
| Recordings, snapshots and exports | /mnt/user/frigate | /media/frigate |
With Secondary storage set to None, mover does not transfer this share between storage tiers. Frigate manages the deletion of old footage through its retention settings. If you choose secondary storage instead, mover can relocate footage, but that does not extend its retention.
For capacity planning, a continuous 1 Mbps stream uses approximately 10.8 GB per day before overhead. Multiply by the combined bitrate and number of days. Activity-only retention varies with the scene, so leave free-space headroom.
Install Frigate
Search for Frigate in Apps. The standard image, ghcr.io/blakeblackshear/frigate:stable, supports the Intel, CPU and USB Coral routes below. NVIDIA inference uses a different image, described in its hardware section. The stable tag changes over time; it is not a pin to the version named above.
- Name the container frigate and leave Network Type at Bridge.
- Set the host paths for
/configand/media/frigateusing the table above. - In Advanced View, review Extra Parameters.
--shm-size=512mis a starting point for shared memory, not a size for every installation. Keep the template's tmpfs setting for/tmp/cache; this stores temporary recording segments in RAM. Preserve the other parameters. Shared-memory requirements increase with camera count and detection resolution. - Review the port mappings. The authenticated web interface uses container port
8971with HTTPS.
Port 5000 bypasses Frigate login, even on your LAN. Do not add a host port mapping for it. If the template already includes one, remove that Port entry unless a trusted integration needs it, in which case restrict access. Keep the authenticated HTTPS mapping for container port 8971.
Before clicking Apply, complete the device setup below for your hardware. Follow only the sections you need.
Intel GPU device setup
Identify the Intel GPU. Open the Unraid host terminal, not the container console, and run:
for node in /sys/class/drm/renderD*; do
  printf '/dev/dri/%s : ' "${node##*/}"
  lspci -nn -s "$(basename "$(readlink -f "$node/device")")"
done
Find the line identifying Intel. Render-device numbers are not fixed vendor assignments, especially when more than one GPU is installed.
Edit the template's Intel/AMD GPU Device mapping to use your Intel render node, with the same path inside the container. For example, if your output identifies Intel at /dev/dri/renderD129, map that host path to /dev/dri/renderD129. If adding an entry, use Add another Path, Port, Variable, Label or Device → Device.
NVIDIA GPU device setup
Use this route for an NVIDIA GPU supported by Frigate and the Unraid NVIDIA driver.
- Install the Nvidia-Driver plugin from Apps. Follow its installation instructions, then open its settings and copy the GPU UUID for the card you want to use. A first installation can require a Docker service restart or reboot, interrupting other containers. The GPU must not be reserved for a running VM.
- In Frigate's template, use
ghcr.io/blakeblackshear/frigate:stable-tensorrtif you want NVIDIA object inference as well as decoding. - In Advanced View, add
--runtime=nvidiato Extra Parameters, preserving the existing parameters. - Add or edit the Variable with key
NVIDIA_VISIBLE_DEVICESand set its value to your GPU UUID. - Add or edit
NVIDIA_DRIVER_CAPABILITIESwith valueall.
NVIDIA access uses the container runtime, not an Intel render-node mapping. The image tag contains tensorrt, but Frigate 0.18 uses the ONNX detector for inference on an ordinary NVIDIA PC GPU. That detector also needs a compatible model; see the detector section below.
AMD GPU device setup
For supported AMD hardware, use the standard image for VAAPI video decoding. Run the render-device command above and find the AMD GPU. Map /dev/dri into the container as a Device, and add a Variable named LIBVA_DRIVER_NAME with value radeonsi.
This enables the container's access to AMD decoding hardware; it does not configure GPU object inference. You can combine it with a Coral detector or another supported detector.
Other hardware
If you do not have a supported GPU, you can start with software decoding and CPU inference. This uses more CPU and is best treated as a way to check the setup before scaling to more cameras. No GPU device mapping is needed.
A USB Coral or Intel NPU accelerates object inference, not video decoding. Their device mappings are covered in the detector sections below.
Click Apply after completing the container settings and wait for Frigate to start.
Find the password and change it
Open WebUI from Frigate's icon on Unraid's Docker tab. The initial HTTPS connection may show a certificate warning because Frigate uses its own certificate. Check that you are opening your own server before continuing.
Frigate prints its generated password in the first-start logs. To find it, run this in the Unraid host terminal:
docker logs frigate 2>&1 | grep -i -B 1 -A 1 'Password:'
Replace frigate if your container has a different name. Log in as admin with the displayed password.
Open Settings → Users → Users, then Reset Password on the admin row. Enter a strong, unique password of at least 12 characters twice and click Save. Log out and back in to check it.
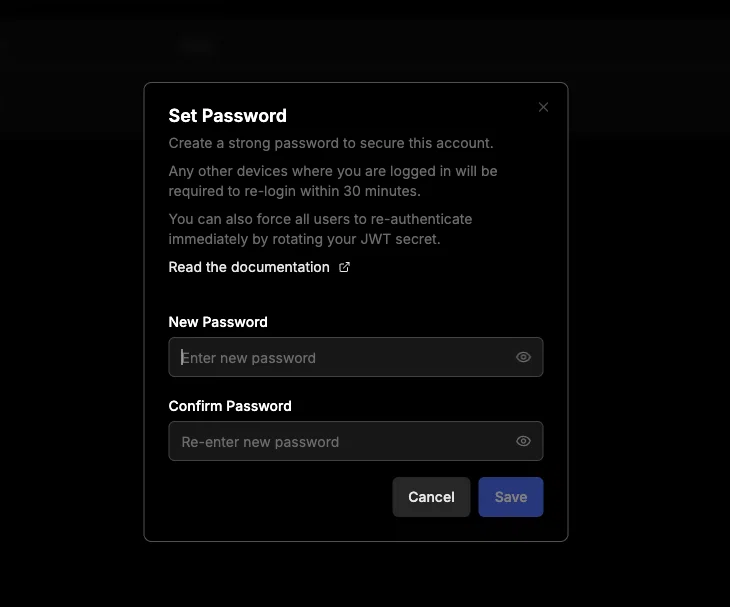
The command only searches retained logs. It does not reset the password or reveal a password you have changed. Log rotation or container recreation can remove the initial output. Keep password output and camera credentials out of screenshots you share.
Connect a separate camera network if needed
Outdoor camera cables are physically accessible connections to your network. Someone could unplug a camera and connect another device, or insert networking equipment while keeping the camera online. A small computer powered over PoE could then provide a foothold on that network.
Keep cameras on a separate VLAN or physical network where possible. Use firewall rules to block access from the camera network to your trusted LAN, while allowing Frigate to reach the required camera services. A separate subnet alone does not provide isolation. Do not expose a switch trunk carrying your trusted VLANs on an outdoor camera port.
With Bridge networking, a firewall-controlled route to the camera subnet is one option. You do not need another container network when that route already works.
Unraid 7.4 also provides Additional Networks for direct attachment. This option was checked on 7.4.0-rc.2:
- Edit Frigate's container template.
- Keep Network Type set to Bridge.
- Under Additional Networks, select your existing camera network. For example,
br0.50is a VLAN 50 network; select the network you created for your cameras. - Supply an unused address if your network configuration requires one.
- Click Apply and check that both networks are attached.
If Additional Networks is absent in your Unraid version, use a firewall-controlled route to the camera subnet instead.
A container attached to both networks is trusted by both. Services listening on its camera-network address may be reachable without crossing the router firewall. Keep camera access restricted, but allow Frigate the outbound connections needed for Tailscale and native push.
Add the main stream and substream
In Frigate, open Settings → Global configuration → Camera management → Add New Camera.
- Name the camera Front House, or use your own descriptive name.
- Enter its local address and camera-account credentials, not your Frigate login.
- Select Manual selection, choose Reolink, then Continue. Other cameras can use their matching preset or Other with a supported stream URL.
- Check that the main stream connects and displays an image. Assign it Record, with Detect and Audio off.
- Copy the main-stream URL from the wizard and choose Add another stream. For this P720, change the ending
/Preview_01_mainto/Preview_01_sub, leaving the rest unchanged. - Click Test Connection for the substream. Give it Detect only.
- Enable Reduce connections to camera on both streams.
- Click Next, review both connections, then Save New Camera.
Use the URLs returned for your camera. Do not paste masked password characters as credentials. The main/sub path substitution is specific to this example, not a universal camera convention.
| Stream | Tested format | Role |
|---|---|---|
/Preview_01_main | 3840 × 2160, 25 fps, H.265/HEVC with AAC | Record |
/Preview_01_sub | 896 × 512, H.264 with AAC | Detect |
These are quality variants of one view, not the two TrackMix lenses. Reduce connections to camera shares each stream through Frigate's restream service; it does not reduce its resolution. Audio is for audio-event detection, not simply hearing sound in playback.
Some Reolink models work through RTSP even when the wizard recommends another transport. That warning is not a reliable test of whether HTTP is enabled. Check Frigate's camera-specific guidance if your stream is unreliable.
Open Live and check that the camera shows a moving picture before continuing.
Choose video decoding hardware
Configure decoding separately from your object detector. A Coral detector, for example, can be combined with Intel or NVIDIA video decoding. Use a decoder that supports your GPU and the detection stream's codec.
Intel QuickSync
Open Settings → Global configuration → FFmpeg. Under Hardware acceleration arguments, choose Preset, then Intel QuickSync (H.264) (preset-intel-qsv-h264). Leave this camera's hardware acceleration set to inherit the global setting.
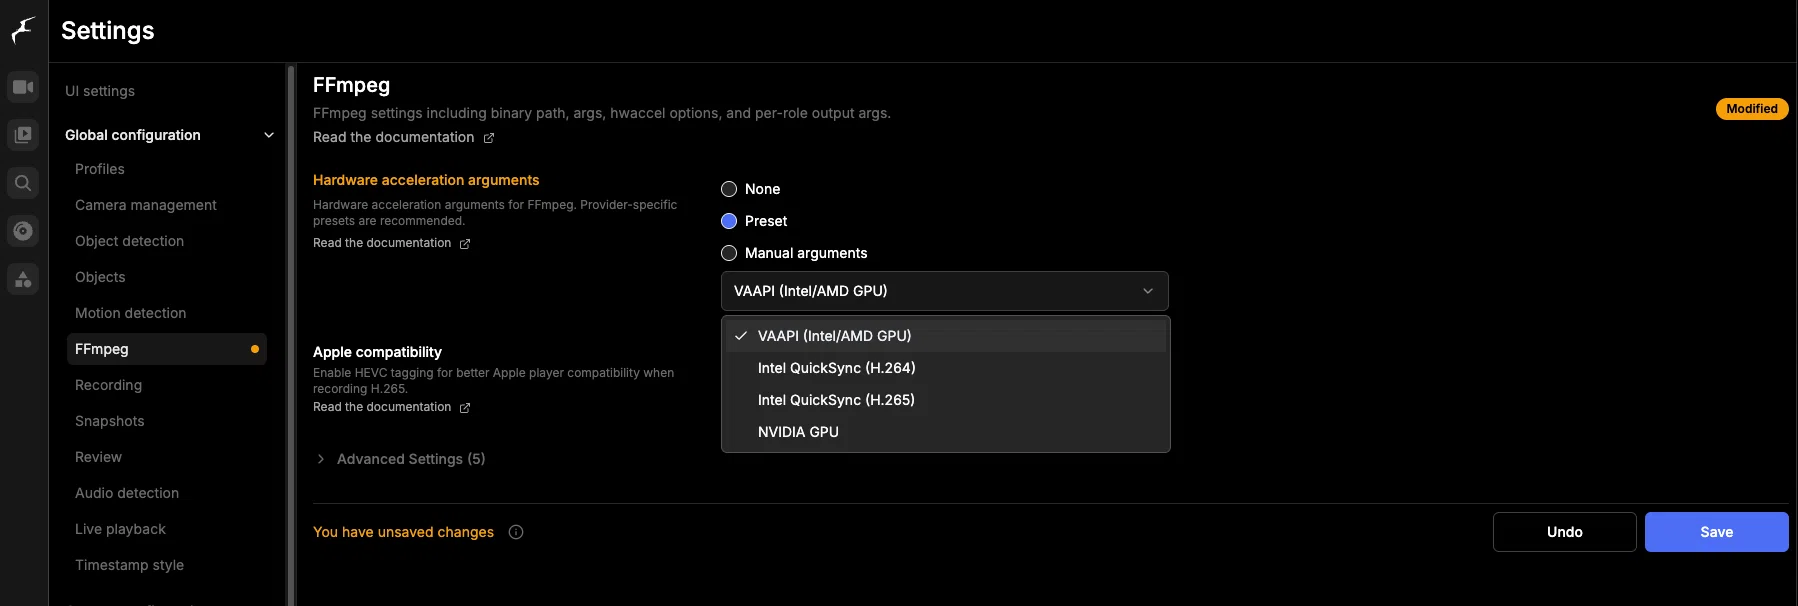
Choose Intel QuickSync (H.264) for an H.264 detection stream, or Intel QuickSync (H.265) for an H.265 detection stream. The example camera uses H.264 for detection; its main H.265 recording is normally copied without decoding. VAAPI is another Intel hardware-decoding option, particularly for older supported Intel GPUs.
Click Save, then restart Frigate from its settings menu. Check that the camera resumes processing without repeated FFmpeg errors. If you use Unraid's GPU Statistics plugin, Intel video-engine activity and the Frigate icon can help confirm decoding activity.
For additional cameras with different detection codecs, choose suitable per-camera overrides rather than applying H.264 to everything.
NVIDIA decoding
After completing the NVIDIA container settings, open Settings → Global configuration → FFmpeg. Choose Preset → NVIDIA GPU (preset-nvidia) under Hardware acceleration arguments. Save and restart Frigate when requested.
The preset selects the appropriate decoder for supported streams. Your card must support the camera's codec and profile. Check for FFmpeg errors and confirm that the camera resumes processing. A working NVIDIA decoder does not require an NVIDIA object detector.
AMD or Intel VAAPI decoding
Under Settings → Global configuration → FFmpeg, choose Preset → VAAPI (Intel/AMD GPU) (preset-vaapi). Save and restart Frigate when requested. This uses supported hardware to decode video, rather than software decoding on the CPU.
Software decoding
If no supported GPU is available, set Hardware acceleration arguments to None. Check CPU use as you add cameras. A lower-resolution detection stream reduces decoding work, while the main stream can still be recorded at full quality.
For GPU generation, codec and driver requirements, see Frigate's video decoding guidance.
Choose an object detector
Choose one of the following detector routes and use its compatible model settings.
After saving and restarting, check the current startup logs for your chosen device and System metrics for running detector statistics. Then follow Choose objects and check detection to confirm recognised activity. A startup message alone only confirms initialisation.
Run the commands below in the Unraid host terminal. They search the last ten minutes of logs; remove --since 10m for older output and check its timestamp. Replace frigate if your container has a different name.
Intel GPU with OpenVINO
Open Settings → System → Detectors and model. Edit the existing detector rather than adding a second, different backend.
- Select OpenVINO as Type.
- Set Device Type to
GPU, in uppercase. - Check the compatible model settings below.
- Click Save and restart Frigate when requested.
| OpenVINO model setting | Value used here |
|---|---|
| Model path | /openvino-model/ssdlite_mobilenet_v2.xml |
| Width and height | 300 × 300 |
| Input tensor layout | NHWC |
| Input pixel format | BGR |
| Input data type | int |
| Model type | SSD |
| Label map | /openvino-model/coco_91cl_bkgr.txt |
Model dimensions are not camera detection dimensions. Frigate prepares image regions for the model; do not change the camera's 896 × 512 setting to 300 × 300.
After restarting, run this in the Unraid host terminal:
docker logs --since 10m frigate 2>&1 | grep -i -E 'OpenVINO|on device GPU'
Look for the model-loading line naming device GPU.
NVIDIA GPU with ONNX (advanced)
This route requires obtaining or exporting a compatible model and copying it into Frigate's configuration storage. If you want a simpler initial setup, use NVIDIA for decoding and a separate detector, such as an existing USB Coral or OpenVINO on the CPU for testing.
Use the stable-tensorrt image and NVIDIA container settings described earlier. Open Settings → System → Detectors and model and select ONNX for the detector type.
You also need a supported ONNX model. Do not reuse the OpenVINO XML or Coral TFLite model. Follow Frigate's ONNX model instructions to obtain or export a compatible model, place it in persistent /config/model_cache, and enter its container path in the model settings. With this guide's appdata mapping, that directory is /mnt/user/appdata/frigate/model_cache on Unraid. Set the model type, dimensions, tensor layout, pixel format and label map to match that model.
For example, the documented YOLOv9-t export at 320 pixels uses these model settings after you copy the exported file into /config/model_cache:
| Setting | Value |
|---|---|
| Model path | /config/model_cache/yolov9-t-320.onnx |
| Model type | yolo-generic |
| Width and height | 320 × 320 |
| Input tensor layout | NCHW |
| Input data type | float |
| Input pixel format | RGB |
| Label map | /labelmap/coco-80.txt |
That ONNX file is not bundled with the image. Use the actual filename and settings for the model you exported. These NVIDIA inference instructions follow Frigate's documentation; they were not part of the tested Intel setup.
Save and restart Frigate, then check the logs for the GPU execution provider and complete the detector checks above.
CPU with OpenVINO
For initial testing on a supported CPU, select OpenVINO and set Device Type to CPU. Use the OpenVINO model settings above, save and restart when requested. No GPU device mapping is needed for CPU inference.
Watch detector inference time and overall CPU load before adding more cameras. A supported accelerator is preferable for an ongoing multi-camera installation. AMD GPU inference is a separate ROCm setup with its own image and compatibility requirements; see Frigate's supported detectors rather than treating VAAPI decoding as inference support.
Intel NPU
Some Intel Core Ultra processors include an NPU. Check that your processor has one, with host driver support and a compatible Frigate runtime and model.
- Check that
/dev/accel/accel0exists on your Unraid host. If it is absent, check NPU support and the host driver before continuing. - Edit Frigate's container template and add a Device mapping from
/dev/accel/accel0to the same container path. - Click Apply.
- In Settings → System → Detectors and model, keep OpenVINO and the compatible model above, but change Device Type to
NPU. - Save and restart Frigate when requested.
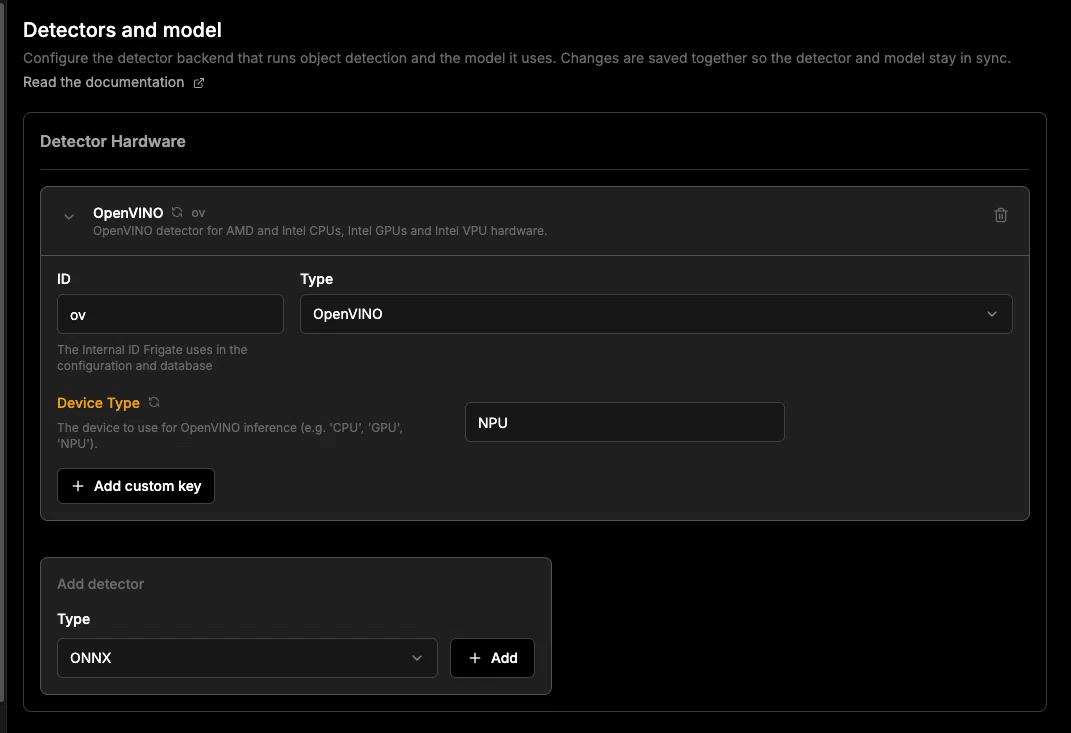
Run this in the Unraid host terminal, then check live detector statistics:
docker logs --since 10m frigate 2>&1 | grep -F 'on device NPU'
The Intel GPU can continue decoding video while the NPU runs inference.
Optional: use a USB Coral instead
An existing USB Coral is another option for compatible inference. It is not needed for the Intel GPU route, and Frigate no longer recommends it for most new installations. Keep your chosen video decoder enabled when switching inference to Coral.
- Connect the Coral using a data-capable cable, preferably to USB 3.
- In the Unraid template, pass
/dev/bus/usbthrough as a Device and click Apply. If you connected it after the container started and it is unavailable inside Frigate, restart the container from Unraid's Docker tab. - Open Settings → System → Detectors and model and change the existing detector's Type to EdgeTPU.
- Enter
usbin Device Type, in lowercase. - Check that the model changes to
/edgetpu_model.tflite, with320×320input,NHWClayout,RGBpixel format andSSDmodel type. - Save and restart Frigate when requested.
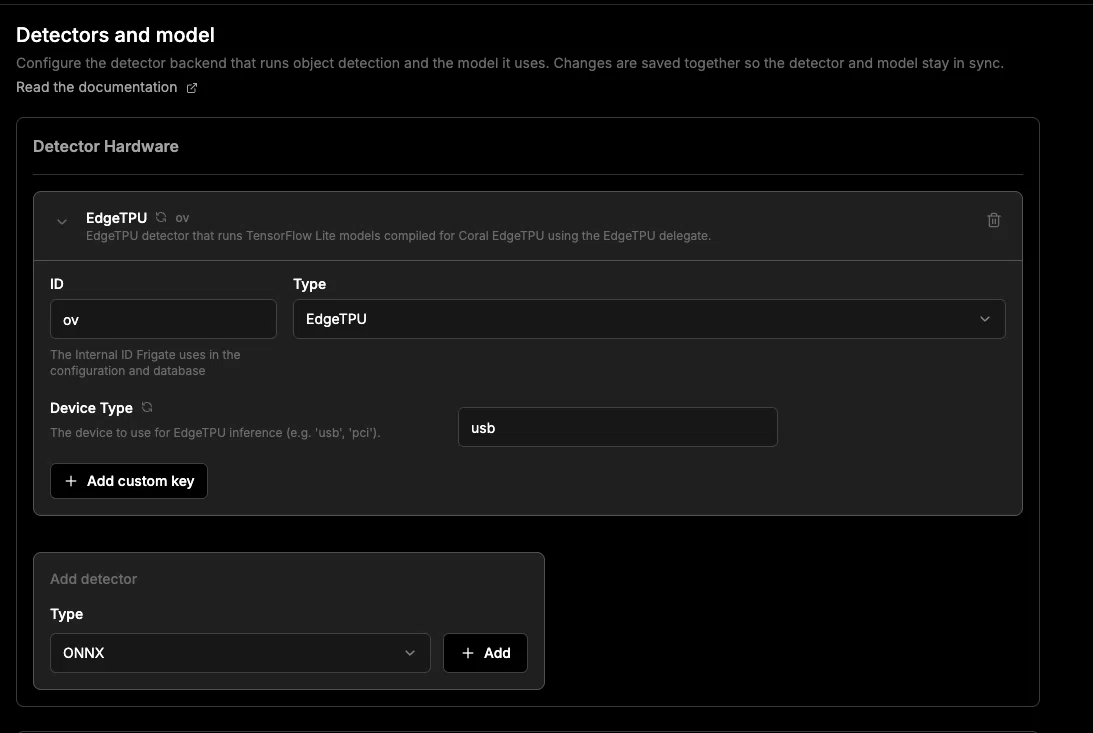
Do not keep the OpenVINO XML model when switching to Coral. The detector ID, such as ov, is only a name and does not select the backend.
Run this in the Unraid host terminal:
docker logs --since 10m frigate 2>&1 | grep -F 'TPU found'
Look for TPU found, then complete the detector checks above.
Choose objects and check detection
Open Settings → Camera configuration, select your camera, then Object detection.
- Enable object detection.
- Check the detection width and height against the connected substream. This camera uses
896×512. - Set detection to
5fps. This is separate from the camera's source frame rate. - Save and complete any requested restart.
- Open Objects and select the labels you want to track. For example, choose Person for an entrance, Car for a driveway, or Dog and Cat for pets. Save the selection.
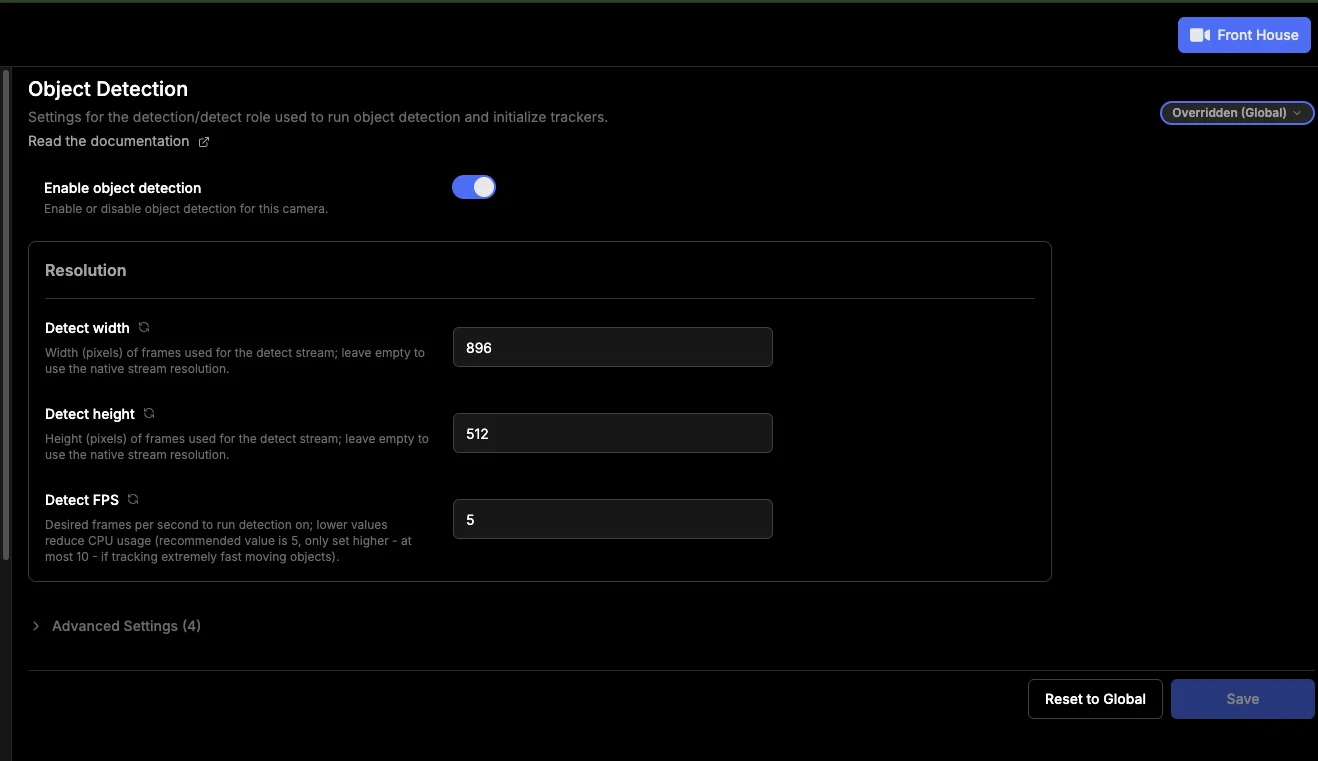
Use your substream's dimensions. The Overridden (Global) badge means this camera has its own settings; it is not an error.
Leave the object filters at their defaults initially. Selecting labels tells Frigate what to track; it does not configure notifications.
To see recognised objects, open Live, select the camera, then open the player's settings cog. Turn Debug View on and enable Bounding Boxes. Check new activity for a labelled box. Debug uses the lower-resolution Detect stream, so it can look less detailed than the main live view. Confidence scores are not guarantees of accuracy.
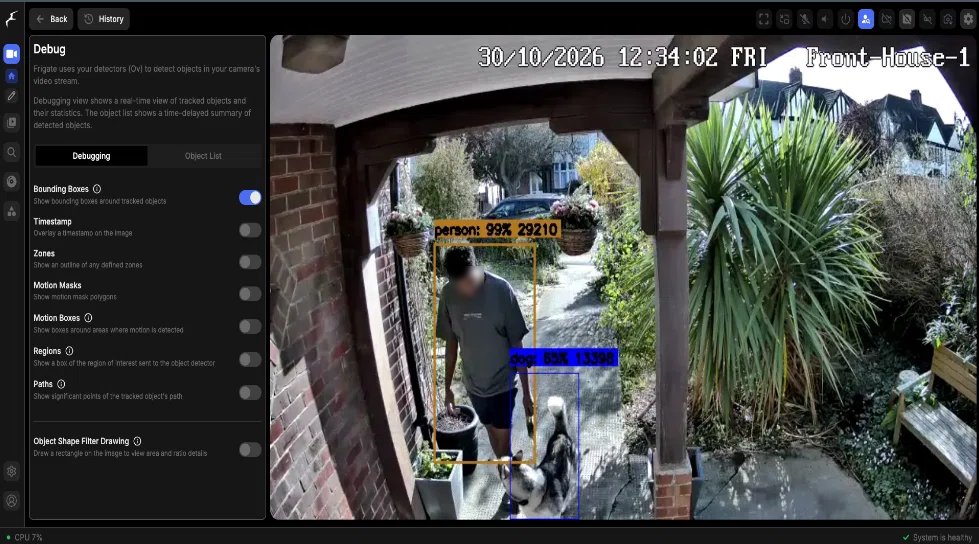
Frigate recognising a person and a dog with bounding boxes enabled. Face blurred for privacy.
Only select labels supported by your detector model. Repeat these settings for each camera, using its own stream dimensions and relevant objects.
Choose recording retention and snapshots
Under Camera configuration, select your camera, open Recording and enable recording. The main stream must have the Record role as well as recording being enabled.
Choose whether to retain continuous footage or only selected activity. The following example retains Alert and Detection footage for ten days, without continuous recording:
| Setting | Value |
|---|---|
| Continuous retention | 0 days |
| General motion retention | 0 days |
| Alert event retention | 10 days, Motion mode |
| Detection event retention | 10 days, Motion mode |
| Pre-capture and post-capture for both categories | 5 seconds each |
For continuous footage, set Continuous retention to the number of days you want, such as 3. You can still use the longer Alert and Detection retention above to keep relevant activity beyond that period. Allow enough storage for the combined camera bitrates.
Expand Alert retention and Detection retention, including their Event retention controls, to check the values. Click Save and complete any requested restart.
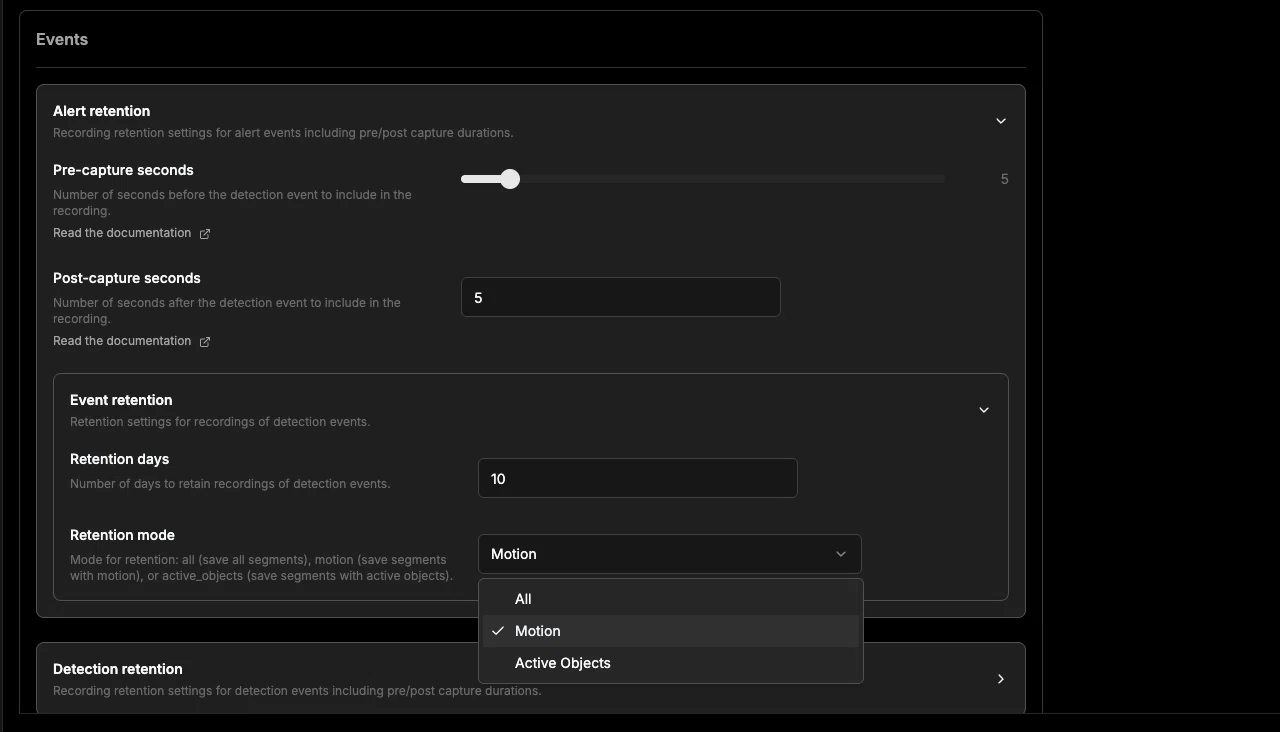
The retention-mode menu offers All, Motion and Active Objects. This example has Motion selected.
Motion retains segments containing motion during the relevant activity. It can omit quiet periods, including some pre/post padding. All in an event-retention section keeps available segments in that event window; it does not enable all-day retention.
Frigate still receives the stream and buffers recording segments. Zero continuous retention does not mean zero background recording activity.
Next open Snapshots for the camera. Enable snapshots, leave bounding boxes enabled and choose a retention period, such as 10 days, then save. These are separate still images from detection imagery, not automatically 4K images from the main recording. They are not added retrospectively to earlier footage.
Check new activity in Explore for saved objects and snapshots. If the settings saved but new activity still produces no snapshots, restart Frigate and test new activity again.
Create zones for the areas you want to monitor
Zones let you give priority to activity in particular parts of the picture. You might want an Alert for a person at the entrance, but only a lower-priority Detection for someone on the pavement.
Frigate uses the bottom centre of an object's bounding box to decide whether it is in a zone. Draw around the ground area rather than the outline of a person's whole body.
- Open Camera configuration, select the camera, then open Zones (shown as Masks / Zones in some views).
- Click + and draw points around the area in perimeter order. Close the polygon by clicking its first point.
- Give it a descriptive name, such as Entrance or Driveway.
- Leave All Objects selected to accept the camera's tracked objects, or turn it off and choose the labels relevant to this zone.
- Save the zone and repeat for other areas you want to monitor.
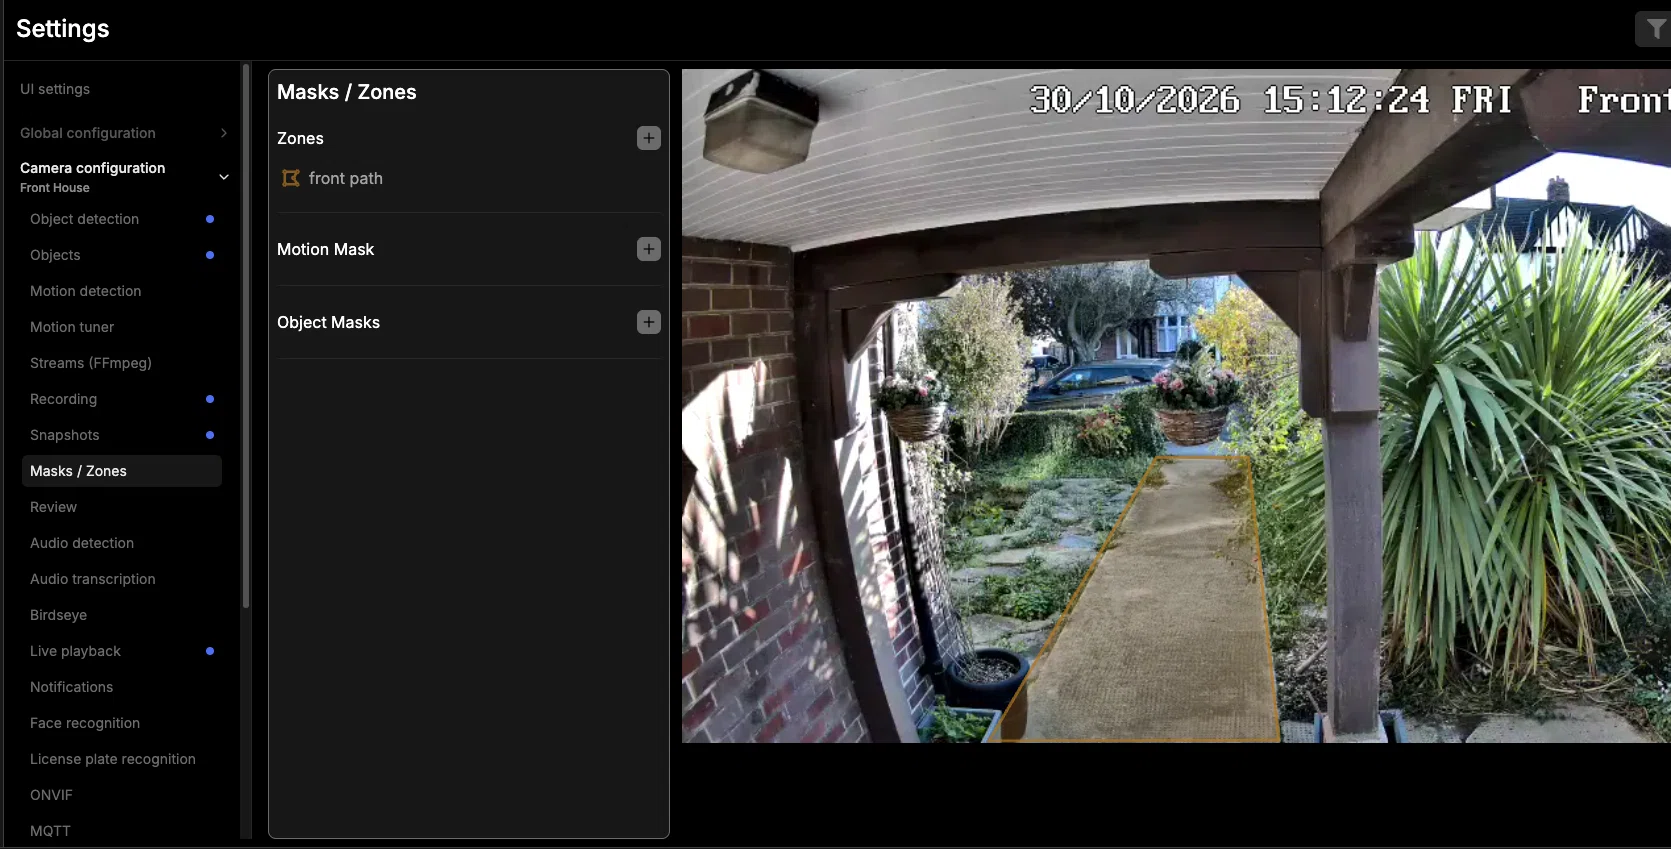
An example of a saved zone. Choose the name and boundaries for your own camera view; you do not need the same layout.
For example, a driveway zone could accept people and cars, while a garden zone accepts people and animals. Zone filters do not add new tracked labels: enable those labels under the camera's Objects settings too.
Keep the camera view fixed when using zones. If camera-native tracking pans the view, the polygons no longer line up with the ground. Returning to a home position does not keep them correct while the camera moves.
Zones determine where activity qualifies; they do not hide private areas in recordings. You do not need a motion mask merely because foliage moves.
Set Alert and Detection priorities
Alerts are the activity you want to prioritise. Detections can retain other eligible tracked activity for review. Choose labels and zones that suit each camera rather than copying the same policy everywhere.
Open the camera's Review settings:
- Keep Alerts and Detections enabled.
- For zone-based Alerts, select the zones where activity should qualify. Entering any selected zone is enough; the object does not need to enter them all.
- Expand Alerts config and choose the Alert labels you want. Include Car if vehicle activity matters, or leave it off for a pedestrian-only area.
- For Detections across the rest of the image, leave Limit detections to specific zones unchecked. Check that the Detection labels include the tracked objects you want to retain.
- Save and complete any requested restart.
For an object to qualify for a zone-based Alert, its label must be tracked by the camera, allowed by that zone and included in Alert labels. Drawing a zone alone does not make it required for Alerts.
A Review item can include several objects. Unrestricted Detections means no zone restriction on eligible tracked activity, not every model class or all movement. Alert is a Review priority; phone delivery is configured separately below.
Check new activity in Review to see whether your settings give it the intended priority. Marking an item Reviewed acknowledges it; it does not delete the footage or protect it from expiry. Enable Show Reviewed to include acknowledged items again.
Play and export footage
Open retained activity in Review or Playback and check that it plays. Frigate assembles its recording segments into the timeline; you do not need to collect the individual files yourself.
- Open Actions → Export.
- Choose Select From Timeline and check the intended interval. The default Last Hour is a different choice.
- Give the export a name and click Export.
- Wait for preparation to finish, then open Exports.
- Find the clip under Uncategorized Exports if you did not assign a case.
- Open its menu and select Download video. Open the downloaded file to check it contains the footage you need.
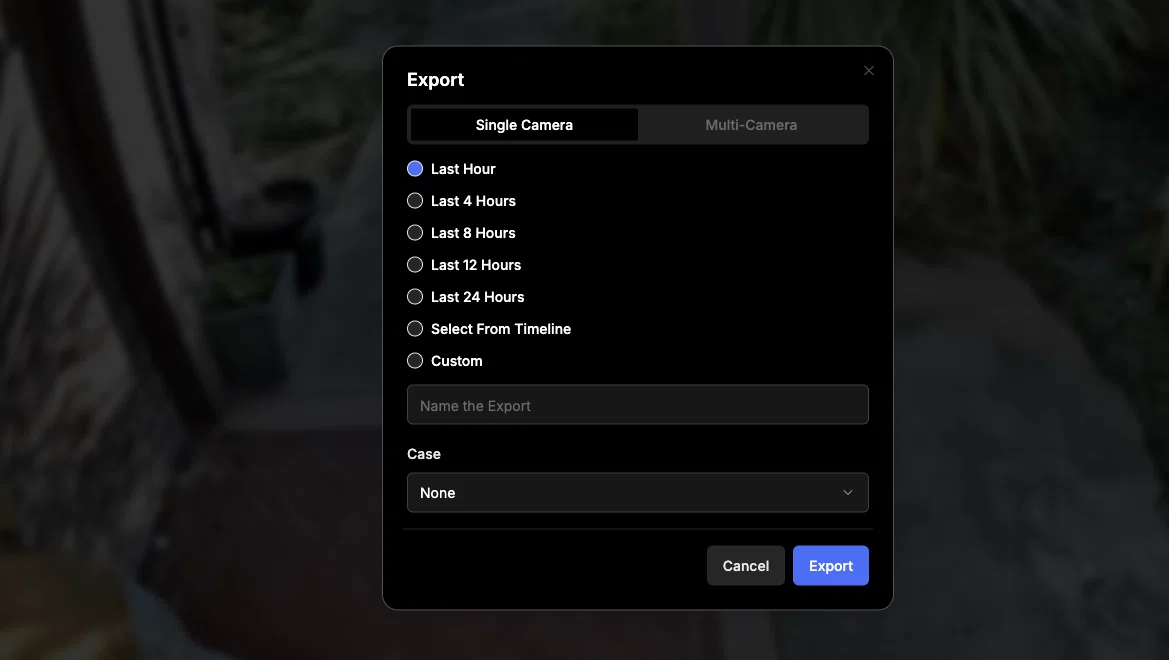
The dialogue opens with Last Hour selected. Choose Select From Timeline when you want to use the interval selected in playback.
Cases are optional organisation. Playback and export need retained footage for the selected period; an export cannot recover expired recordings or fill gaps that were not retained.
Add private HTTPS access with Tailscale
This route gives Frigate its own Tailscale identity through Unraid's Docker integration. It uses private Serve, not public Funnel, and needs no router port forwarding.
Use an Unraid version with the container Use Tailscale controls described in Unraid's Tailscale guide. Keep Bridge networking for this route; the integration does not support Host mode.
Create a Tailscale account if needed. In its admin console, enable MagicDNS and HTTPS certificates under DNS for trusted Serve access. Certificate hostnames appear in public certificate logs, so choose a name you are comfortable sharing.
Install Tailscale on your phone and sign in to the same tailnet. Keep Frigate authentication enabled and restrict access to the intended users and devices. The Unraid host's Tailscale plugin is optional for this container integration.
-
Edit Frigate on Unraid's Docker tab.
-
Enable Use Tailscale and choose a unique Tailscale Hostname, such as frigate.
-
Set Tailscale Serve to Serve.
-
Set Tailscale Serve Port to
8971. -
Turn Tailscale Show Advanced Settings on.
-
Set Tailscale Serve Protocol to
https. -
Set Tailscale Serve Target to the following value, without a port:
https+insecure://localhost -
Leave the optional local path, protocol port and Serve path fields blank for this setup.
-
Click Apply, then open the container log and follow its authentication link privately to connect the container to your tailnet.
Do not append :8971 to the target: this integration adds the separate Serve Port value. The insecure part accepts Frigate's self-signed certificate only on the local upstream connection. Your phone still sees trusted HTTPS, and Frigate still requires a login.
After authentication, use the container's Tailscale WebUI link shown by Unraid. Alternatively, find the Frigate device in Machines in the Tailscale admin console and copy its full DNS name. Open that name with https:// on the connected phone and log in.
With Bridge networking and userspace networking disabled, the original LAN WebUI address may no longer work. Use the Tailscale address instead. Review the device's key-expiry policy so renewal does not unexpectedly interrupt access. Tailscale does not replace updates, passwords or access controls.
Enable notifications
Open Settings → Notifications in Frigate.
- Enter a real, valid contact email address.
- Enable the cameras you want notifications from. Leave All Cameras off if you are choosing individual cameras.
- Click Save and restart Frigate if requested or if it shows notifications suspended until restart.
- Check that the camera shows Notifications Active.
The email is contact information for the push service, not an email-alert destination. No SMTP server, MQTT broker or Home Assistant installation is needed.
Native notifications use Web Push and need outbound access to the browser vendor's push service. Local object detection does not make this notification route wholly offline. Tailscale provides access to the private page and footage; push transport is separate.
Register the iPhone and send a test
Use iOS 16.4 or later and trusted HTTPS. An ordinary Safari tab is not the Home Screen web app used for iPhone push.
- Connect Tailscale and open Frigate's private HTTPS address in Safari.
- Open Share → Add to Home Screen, then confirm Add.
- Launch Frigate from the new Home Screen icon and log in.
- Open Settings → Notifications. Under Device Specific Settings, tap Register This Device.
- Choose Allow when iOS requests notification permission. The button should change to Unregister This Device.
- Restart Frigate after registration, then reopen the installed app and check that notifications are active.
- Tap Send a test notification.
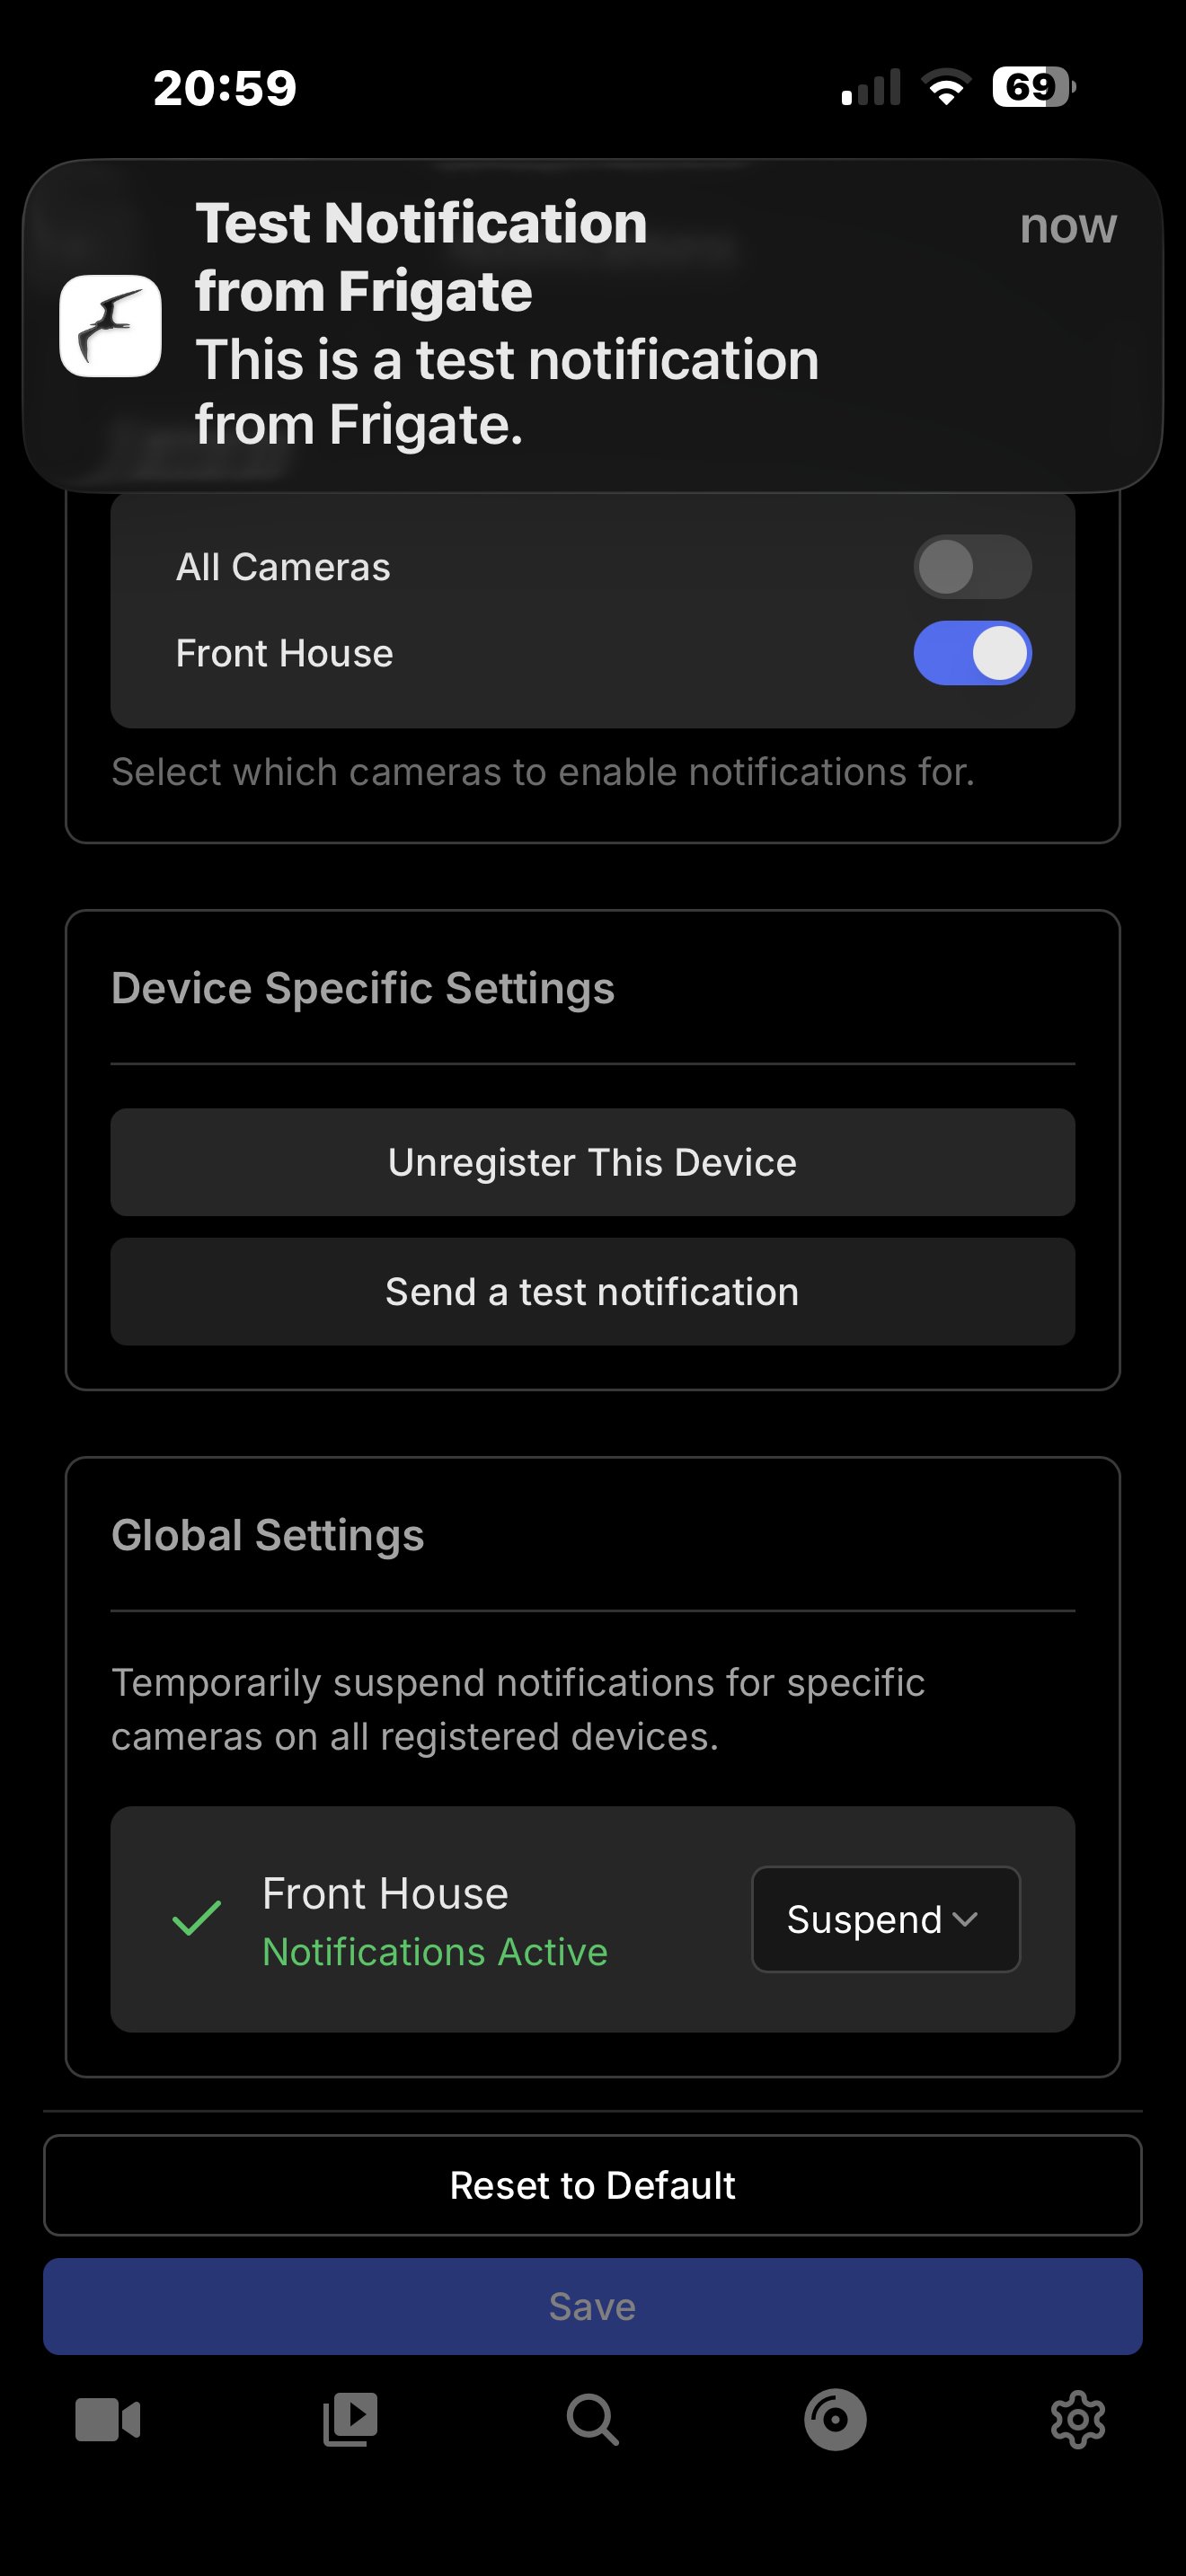
If no banner appears, check Notification Centre, notification permissions and Focus settings. Sleep Focus can hide or silence a banner; active camera settings alone do not prove delivery.
Once the test arrives, check that new activity matching your Review Alert settings also produces a notification. Keep Tailscale connected when opening the private footage from a notification.
Repeat the camera setup for your other cameras, adjusting stream settings, tracked objects, zones and retention to suit each view. Monitor storage use and system load as you add cameras. For further options, see the Frigate documentation.