Shares
A key feature of Unraid is the management of shares. Shares are folders or drives on your Unraid server that can be accessed over a network. You can create as many shares as you want on your Unraid server. These shares can be secured, and their configuration determines how data is written and distributed across your array or named pool of drives.
Unraid offers two types of shares to optimize your data management:
- User Shares: These utilize Linux FUSE and represent folders within the broader file system.
- Disk Shares: These share the entire disk using the drive’s file system.
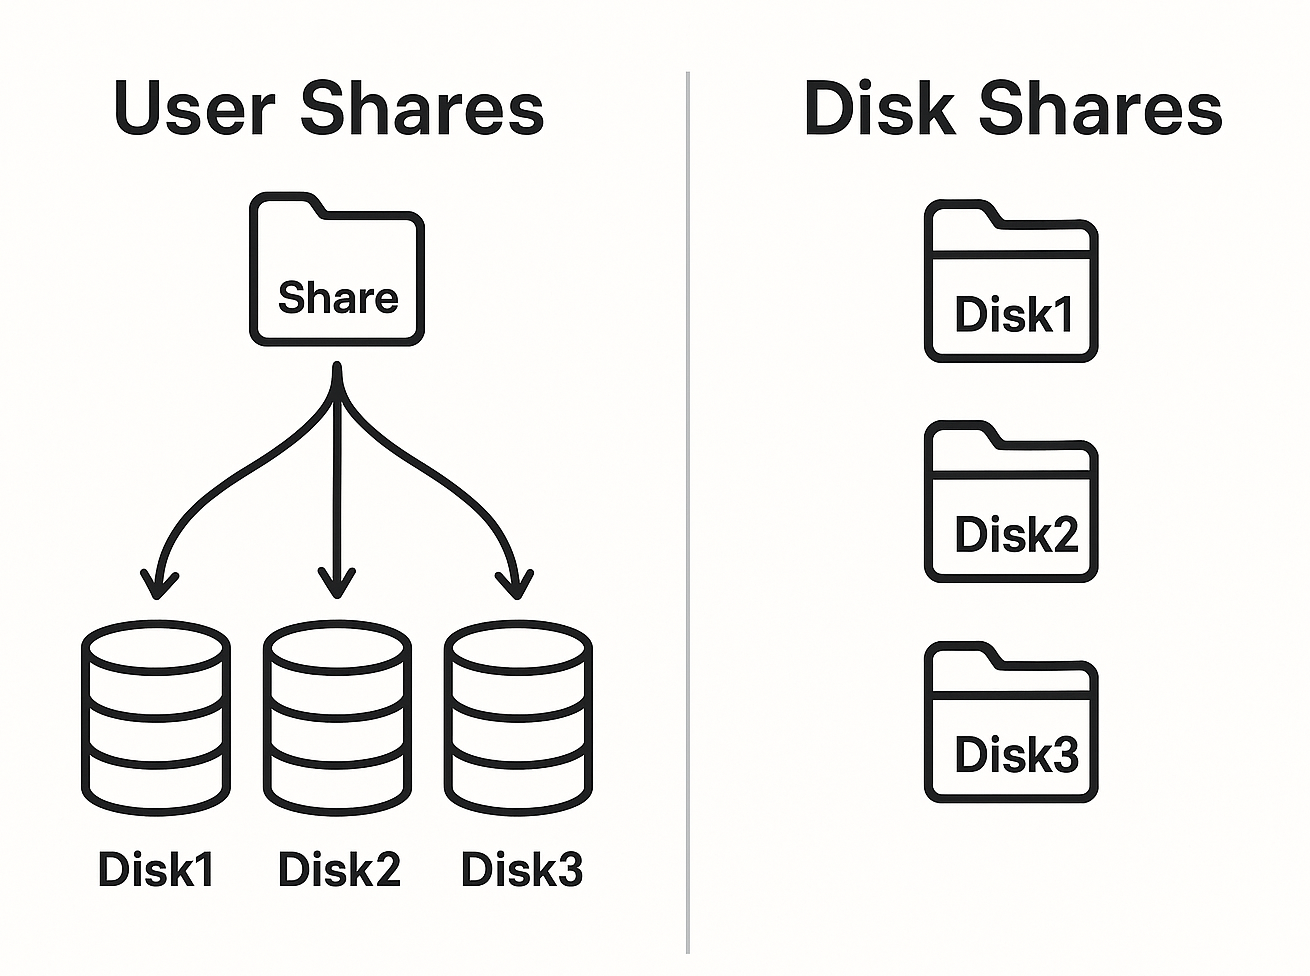
It's important to remember that both share types present different views of the same underlying file system; any file or folder visible in a user share will also appear under the disk share for its respective physical drive.
When you start services like Docker or VM Manager, Unraid automatically creates a set of default user shares designed to support common plugins, Docker containers, and virtual machines (VMs). You can conveniently create additional shares for your personal data as needed.
To manage your shares, simply navigate to the Shares tab in WebGUI. Here, you can easily enable or disable shares through Settings → Global Share Settings. By default, user shares are enabled, providing a straightforward starting point for your file organization.
User shares
User shares provide an aggregated view of top-level folders with the same name across cache and array drives. The share name corresponds to the folder name, creating a unified network-accessible view that spans multiple drives. It's important to note that while directories appear merged, individual files remain stored on a single drive.
Managing user shares
You can access and manage User shares from the Shares tab in the WebGUI. This interface allows you to:
- Review all existing shares
- Create new shares
- Modify or delete existing shares
Any top-level folder that is manually created on a drive is automatically recognized as a User Share and assigned default attributes.
File system structure
At the Linux level, User shares are accessible under /mnt/user, which combines files from both the array and pools. This logical view overlays the physical file system, meaning files are also visible through Disk Shares at the drive level.
The deprecated /mnt/user0 mount point (which excludes pool files) may be removed in future Unraid releases.
Storage allocation
The physical drive that stores a file is determined by share settings such as Allocation Method, Included/Excluded Disks, and Split Level. Changes to these settings will affect only new files; existing files will remain untouched unless moved manually.
Do not mix User Shares and Disk Shares
Never copy or move files directly between a user share and a disk share (for example, between /mnt/user/share and /mnt/disk1/share) - especially if the folder names are the same. This can cause file corruption or permanent data loss.
For safe file management practices and more details, see the Disk share guidelines below.
Add a share
Before creating a share, consider how you'll use it, your performance needs, security, and where files should be stored.
Even though network shares (SMB) don't care about capitalization (e.g., MEDIA is the same as media), Linux file systems do. Avoid using names that are identical but only differ in case to prevent issues.
To add a share:
- Go to the Shares tab and click Add Share.
- Pick a unique name for your share, like
MediaorDocuments. - Configure optional settings:
- Comments: Write a short description to identify your share (e.g., "Family Photos").
- Minimum Free Space: Decide on a minimum amount of free space (e.g.,
50GBfor large files). For more details, see Minimum free space.
- Select storage locations:
- Primary Storage: Choose where the share will initially be stored (e.g., cache, array, or a specific pool).
- Secondary Storage: Set an overflow location that can be used when primary storage is full, and also serves as the final destination for the share once the Mover runs.
- For more details, see Primary and secondary storage.
- Set data rules:
- Allocation Method: Pick how data will be stored - options include high-water, fill-up, or most-free. For more details, see Allocation method.
- Split Level: Determine how folders should be organized. For more details, see Split level.
- Manage drives:
- Included Disks: Choose specific drives to include (e.g.,
disk1,disk2). - Excluded Disks: Specify any drives you want to exclude (like older drives).
- For more details, see Included or excluded disks.
- Included Disks: Choose specific drives to include (e.g.,
- (Optional) Configure Mover settings:
- Mover Action: Decide the direction of data movement (either Primary → Secondary or Secondary → Primary).
- For more details, see Moving files between cache and array.
- Click Add Share to finish setting up your new share.
By default, a new share will not be shared over the network. You must configure network access after the share is created.
You can configure either Included or Excluded Disks, but not both at the same time.
Delete a share
To prevent any potential data loss, shares that contain data cannot be deleted. You must either delete or relocate all contents within the share first. Always double-check to confirm that the share is empty before proceeding with its removal.
Delete a share containing data
For shares containing data:
-
Empty the share:
- Use the built-in File Manager accessible through Tools → File Manager or click the
 icon in the top-right corner.
 - Find your share in Shares and click the Browse icon.
- Delete or move all files using the file manager.
Alternative methodsYou can also:
-
Use the command line: Open the Web Terminal (Tools → Terminal) or connect via SSH, then run
rm -rf /mnt/user/[share_name]/*(replace[share_name]with your share's name). -
Use network access: Connect via Windows Explorer (SMB) or macOS Finder (AFP/SMB) and manually delete the files.
cautionThe
rm -rfcommand will permanently delete files. Double-check before using it. Make sure no Docker or VM services are using the share before you delete it. - Use the built-in File Manager accessible through Tools → File Manager or click the
-
Delete the share:
- Go back to Shares and click the now-empty share.
- Check the Delete box and click Delete.
- Confirm and click Done.
Delete an empty share
To delete a share that's already empty:
- Go to the Shares tab.
- Click the share you want to delete.
- Check the box next to Delete. The button changes to Delete.
- Click Delete.
- Confirm and click Done.
Share settings
Minimum free space
The Minimum Free Space setting works in conjunction with the allocation method and split level to determine where new files are stored. This setting specifies the amount of free space that must remain on a drive for it to be considered eligible for new file writes. If a drive's free space falls below this threshold, Unraid will stop placing new data on that drive, provided that the split level permits splitting to another disk.
How it works
When transferring a file (e.g., file.eg), Unraid selects a disk based on available settings but cannot predict the final size of the file. If the chosen disk runs out of space during the transfer, the operation will fail with a "disk full" error. To prevent this, set the Minimum Free Space to a value that is larger than your largest file. This ensures that Unraid avoids disks that cannot accommodate the entire file.
Recommendation
Set this value to twice the size of your largest file. For example:
- If your largest file is 8GB, then set Minimum Free Space to 16GB.
This buffer accounts for variations in file sizes and helps prevent transfer failures.
Configuration
- Enter the value in KB, MB, GB, or TB (e.g.,
50GB). - New user shares default to 10% of the disk’s total capacity.
Always configure Minimum Free Space when using the fill-up allocation method. If you do not set it, you may encounter "disk full" errors during write operations.
There is a separate Minimum Free Space setting for cache pools. You can access this by going to the Main tab and clicking on a pool. Make sure to set this value higher than your largest file to avoid overfilling, especially for shares configured with Yes or Prefer cache modes.
Limitations
- Unraid prioritizes split level rules over free space settings. If splitting is not allowed, files may still fill up a disk regardless of the free space threshold.
- Updating existing files (for example, when growing backup files) does not trigger redistribution, which can lead to "disk full" errors as time goes on.
For more detailed guidance, use the Help icon in the WebGUI while configuring your shares.
Primary and secondary storage
Unraid’s storage management lets you control where new files are written and how data moves between pools, cache, and the array. The options and terminology differ between Unraid 6.12+ and earlier versions.
- Unraid 6.12 and later
- Unraid 6.11 and earlier
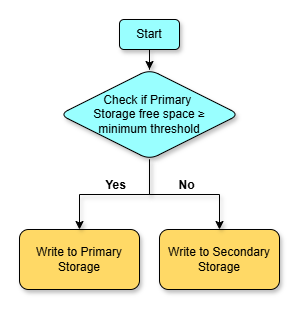
The Primary Storage setting determines where new files for a share are initially written—this can be the cache, the array, or any named pool. The Secondary Storage setting specifies an alternate location for new files and folders if the primary storage falls below the Minimum Free Space threshold.
The Mover function automatically transfers files between primary and secondary storage based on your schedule, ensuring optimal performance and storage utilization.
If you select the array for primary or secondary storage, you must also configure its allocation method, split level, and any included or excluded disks. These settings do not apply to pools.
Primary storage drop-down:
- This setting is required for each share.
- You must select a primary storage device or pool (default is Cache).
- You can choose any named pool or the array.
Secondary storage drop-down:
Unraid uses the Mover to manage file placement between the cache and array, controlled by the Use Cache for New Files setting for each share:
- Yes: New files go to cache if space allows; otherwise, to the array. Mover transfers files from cache to array.
- No: New files go directly to the array. Mover does nothing for this share.
- Only: New files are written only to the cache. If there’s not enough space, writing fails. Mover will not move files from array to cache.
- Prefer: New files go to cache if there’s space; otherwise, to the array. Mover tries to move files from array back to cache when possible.
This setting is the default for appdata and system shares to improve Docker and VM performance.
Moving files between cache and array
Unraid provides a straightforward way to manage file placement between cache pools and array, allowing you to optimize performance and manage your data effectively. The key is to set up your share settings based on your preferred data flow and let the Mover handle file transfers automatically according to its schedule.
Cache to array
Use case: Moving files from your high-speed cache to the array for long-term storage.
- Unraid 6.12+
- Unraid 6.11 or below
- Change the share’s Use Cache setting to Yes.
- The Mover transfers files automatically according to your schedule. Manual runs are optional.
- After the files are moved, you can change the Use Cache setting to Only if you want.
Array to cache
Use case: Improving performance for Docker containers and VMs by moving files to the cache.
- Unraid 6.12+
- Unraid 6.11 or below
- In the share settings, set Primary Storage to Cache and Secondary Storage to Array.
- Set the Mover action to Array -> Cache.
- The Mover will run automatically based on your schedule to move files, with manual runs as an option.
- Set the share’s Use Cache to Prefer.
- The Mover runs automatically based on your schedule to move files, and manual runs are optional.
- After files are moved, you can change Use Cache to No if you prefer.
If you run into issues with file movement, you can enable Mover logging through the Settings → Scheduler → Mover Settings page. This logs every file moved and can be viewed in Tools → System Log.
- Make sure your parity is valid before moving files from the array to the cache.
- If dealing with large datasets, keep an eye on Mover activity via the logs.
- If files appear to be "stuck," consider temporarily disabling Docker and the VM Manager, then running the Mover manually via Main → Array Operation → Move.
Allocation method
When you create a new user share or add any file or folder inside it, the system needs to decide where to store this data. Usually, it will choose the data disk that has the most free space available. However, you can adjust how this decision is made using certain settings.
There are three straightforward options you can select for how the system allocates storage for your user share:
High-Water (Recommended)
How it works
The High-water method progressively fills disks using "switch points" based on half the largest drive's capacity. This balances disk usage while keeping related files together and minimizing drive spin-ups.
Example with 8TB, 3TB, and 2TB drives
- First pass: Fill 8TB drive until 4TB free remains (half of 8TB).
- Second pass: Fill 8TB/3TB drives until 2TB free remains.
- Third pass: Fill all drives until 1TB free remains.
Best for:
- Media servers (e.g., Plex)
- Scenarios where keeping files on fewer disks improves spin-down efficiency
- Arrays with mixed drive sizes
High-water is the default method and works well for most users. It reduces drive thrashing compared to "Most-free."
Most-Free
How it works
The Most-free method selects the disk with the most free space for each new file. This maximizes storage efficiency but increases drive thrashing.
Performance impact
- Frequent disk switches keep multiple drives spun up
- May reduce parity write speeds due to overlapping operations
Best for:
- High-throughput workflows (e.g., video editing)
- Temporary or cache-like data
- Arrays where performance outweighs power savings
Combine with split level settings to group related files despite frequent disk switching.
Fill-Up
How it works
The Fill-up method writes to disks in numeric order until they reach the Minimum Free Space threshold, then moves to the next disk.
Requirements
- Always set Minimum Free Space (e.g., 2x largest file size)
- Configure Split Level to control file grouping
Best for:
- Static data archives
- Users who prefer manual disk management
- Arrays with identical drive sizes
Without Minimum Free Space configured, "disk full" errors will occur when a drive nears capacity.
Split level
The Split Level setting in Unraid helps manage how files and folders are organized across multiple disks. It determines how deep folder structures can go on different disks while keeping certain files together. The split level is numbered starting from 1, where the top level (the main share) is considered level 1.
Automatically Split Any Directory (Default)
Behavior
Unraid creates any required folders on the selected disk, regardless of folder depth. New files and folders are placed based on allocation method and available space, even if their parent directories do not already exist on that disk.
Use Case
Best for general data shares where folder structure is not critical, such as downloads or mixed media libraries. Allows maximum flexibility for file placement and disk utilization.
Automatically Split Only Top Level
Behavior
Unraid will only create first-level subfolders on a disk if they don't already exist. For deeper folders, new files and folders are placed on the disk where the parent directory exists.
Use Case
Ideal for media libraries (e.g., Movies/Title) where you want all files for a specific subfolder (like a movie or TV show) to remain together on the same disk.
Automatically Split Top 'N' Levels
Behavior
You specify how many directory levels (N) Unraid will manage automatically. For folders at or above level N, Unraid can create them as needed. For deeper levels, new files are placed on the disk where the parent directory exists.
Use Case
Useful for complex folder structures, such as nested project directories, where you want to keep related content grouped together beyond just the top level.
Manual (No Automatic Splitting)
Behavior
Unraid only places new files or folders on disks where the parent directory already exists. No new directories are created automatically.
Use Case
Best for advanced users who want full manual control over file placement, or for archival data where folder structure must remain fixed.
If there are conflicts between Minimum Free Space, Split Level, and Allocation Method, the Split Level setting takes priority. This may result in "out of space" errors, even if other drives have available space.
Included or excluded disks
These settings help you manage which drives can hold files for your share. You can either include specific disks or exclude certain ones - just don’t do both at the same time! If you don’t choose any specific disks, all drives allowed in Settings → Global Share Settings will be used.
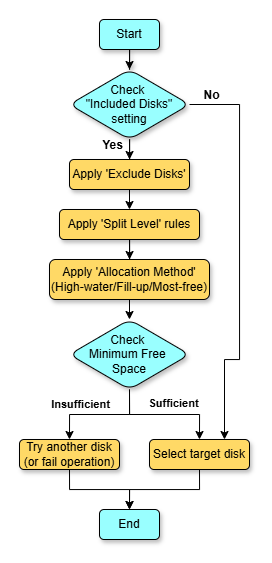
Unraid first checks any included disks, then looks at excluded disks to determine where to store a file. After that, it uses the split level and allocation method to select an appropriate disk.
The settings for included and excluded disks only affect where new files can be saved. Any existing files in folders that match your share name will still be accessible for reading, even if they’re on a different disk.
Included Disks
Behavior
Unraid will only consider the listed disks when deciding where to place new files for the share. All other disks are ignored for new writes, but files already present on other disks remain accessible for reading.
Use Case
Use this setting if you want to restrict a share to certain disks, such as keeping important documents on newer or higher-capacity drives, or isolating a media library to specific disks for performance or organizational reasons.
Excluded Disks
Behavior
Unraid will use all eligible disks except those listed here when placing new files for the share. As with included disks, files already present on excluded disks remain accessible for reading.
Use Case
Use this setting to prevent a share from using certain disks, such as excluding older drives, slower disks, or drives reserved for other data types.
Default shares
When you use Unraid with Docker or Virtual Machines (VMs), it automatically creates some default shares.
You don’t have to use these shares if you don’t want to, and you can remove them if you prefer, but we usually recommend keeping them for convenience. These shares help keep things organized and make it easier for everyone to get support if they run into issues.
Here’s a quick overview of what each default share is for:
appdata: This is where all the working files for your Docker containers are stored. Each Docker container usually has its own folder here.system: This share holds the essential files for your Docker applications and the XML templates for your VMs.domains: This share is designated for storing virtual disk images (vdisks) that your VMs use.isos: This is where you can save CD ISO images that you want to use with your VMs.
It's best not to change the permissions on most of these default shares because doing so might cause issues with how Docker containers and VMs work. The only share where changing permissions is recommended is the isos share, as this one can be accessed over the network for adding new ISO files for virtual machines.
Disk shares
Disk shares are simply individual drives or pools of drives within your Unraid system that can be accessed over the network. By default, these shares are turned off, but you can easily enable them in the Settings → Global Share Settings section.
To keep things secure, make sure to set user access permissions for these shares appropriately. This is especially important if you have multiple users accessing your network.
To enable disk shares:
- Navigate to Settings.
- Click on Global Share Settings.
- Turn on disk shares to make them visible in your network.
Once you enable them, you'll notice disk shares in the Unraid GUI under a section labeled Disk Shares in the Shares tab. Each drive in your array can be accessed like this:
- Individual drives: These appear as
/mnt/diskXwhere X is the disk number (e.g.,disk1,disk2, etc.). - Pools of drives: If you have multiple drives grouped together, they will show up as
/mnt/pool-name. The most common pools is calledcache, but you can name your pools however you like.
The Unraid boot device, which stores your Unraid settings, is not treated as a disk share. If you want it to be accessible over the network, you can set it up as a share named 'flash'. This device is mounted at /boot in Linux.
For security, it's best to keep your shares in Private mode and only grant access to trusted users.
Disk share guidelines
Never copy files directly between a user share and a disk share if their folder names are the same. This could lead to files being corrupted or deleted, resulting in permanent data loss.
User shares and disk shares may look different in the interface but can point to the same files on the disk. Linux commands like cp or rsync cannot always tell the difference, which can accidentally lead to overwriting or deleting files.
Safe copying tips
-
Stick to one type of share:
- Only copy files between either user shares OR disk shares, not both at the same time.
- Example: To copy a file from one user share to another:
cp /mnt/user/share1/file /mnt/user/share2/file
-
Use external drives safely:
- Connect external drives using the Unassigned Devices plugin to prevent issues.
- Copy files from
/mnt/disks/instead of from the main array or cache paths.
-
Verify your copies: When moving files locally, you can use
rsync -cto check that the files copied over correctly. -
Don't mix share types: Avoid using paths that mix user shares and disk shares, such as
/mnt/user/share/with/mnt/disk1/share/in the same command.
If you need to transfer files from external Windows or Linux network shares (SMB/CIFS) to your Unraid server using command-line tools, see File transfer operations in the Command line interface documentation.