Cache pools
In Unraid, a cache pool is a collection of one or more drives, typically SSDs or high-speed HDDs. These drives temporarily store data before it's moved to your main array. Using cache pools can significantly enhance write speeds, protect your data, and provide dedicated storage for specific tasks like running Docker containers or virtual machines.
Cache pools offer several advantages, making them a valuable addition to your Unraid setup, such as:
-
Faster write speeds: Cache pools allow you to quickly write data to faster drives before it gets transferred to the main array. This greatly enhances perceived performance when saving files.
-
Data protection for cached files: By using multiple drives in a cache pool (like setting them up in RAID 1), you add redundancy. This means your cached data is protected from drive failure before it even reaches the main array.
-
Optimized storage for applications: Storing applications like Docker containers or virtual machines on a cache pool improves their performance, reduces wear on your main array, and minimizes the time it takes to access frequently-used files.
-
Flexible and dedicated storage: With multiple cache pools, you can assign specific pools for different tasks. For instance, you could have one pool dedicated to downloads and another for virtual machines, reducing competition for resources and boosting efficiency.
- Multiple pools: You can create and name different cache pools, tailoring them to match your specific needs.
- SSD vs. HDD: SSDs are great for speed, while you can use HDDs for large, sequential data workloads. Additionally, HDDs can help prolong the lifespan of your SSDs.
- Redundancy matters: To protect your data, use more than one drive in a cache pool. A single drive pool won't protect you from potential drive failure.
- File system choice: The default file system for cache pools is BTRFS, which supports various RAID options for added redundancy and flexibility. For more details on file system selection, see File systems.
- Mover integration: Data written to a cache pool is automatically transferred to your main array based on a schedule you set. This keeps your user shares organized and easy to manage.
- Application performance: By placing Docker containers, app data, and VM disks on a cache pool, you enhance access speed and minimize strain on your main storage.
Pool modes
Unraid cache pools can operate in two main modes: single device mode and multi-device mode. Knowing the difference between these modes will help you find the right balance between performance, flexibility, and data protection for your needs.
Single device mode
In single device mode, your cache pool consists of only one device. This means:
- No redundancy: If the device fails, any data stored on it that hasn't been transferred to your array will be lost.
- File system options: You can use file systems other than BTRFS, like XFS or ZFS.
If you choose a non-BTRFS or non-ZFS file system in single device mode and later decide to add more devices to the pool, you will need to reformat the device as BTRFS or ZFS first. That's why BTRFS is the default file system for cache pools, even when using just one device. Both BTRFS and ZFS support adding devices later to create mirrored pools. For more information on file system selection and compatibility, see File systems.
Single device mode is straightforward. You can easily add or remove the device, but you won't have options for advanced features like redundancy or expansion.
Multi-device mode
When you set up a cache pool with more than one device, it enters multi-device mode. Here's what you should know:
- Data protection: This mode uses BTRFS or ZFS to mirror data across devices, helping protect your cached data from drive failure. You can lose one device without losing any data.
- Mix and match: You can add or remove devices of different sizes and types, including mixing SSDs and HDDs.
- Capacity management: Use the BTRFS disk usage calculator to estimate how much space you'll have based on the RAID level and sizes of the devices you're using. For ZFS pools, use the ZFS storage guide for configuration details.
Common tasks for the cache pool include:
- Switching between single and multi-device modes
- Adding disks to a pool
- Replacing disks in a pool
- Moving files between the pool and the array (see Moving files between a pool and the array)
Switching to Multi-Device Mode
Cache pools in Unraid can be expanded from a single device to multiple devices, allowing for increased capacity and redundancy. To take advantage of multi-device mode, your pool must be formatted as BTRFS or ZFS.
Converting a pool to BTRFS or ZFS
If your cache pool isn't already formatted as BTRFS or ZFS, you can convert it using the following steps.
To convert a pool to BTRFS or ZFS:
- Back up important content. See Moving files between a pool and the array to move files from your pool to the array.
- Stop the array.
- In the Main tab, click the pool and select BTRFS or ZFS as the file system format.
- Start the array.
- When the pool shows as unmountable, confirm and click Format.
- After formatting, you’ll have a BTRFS or ZFS pool (single device at this stage).
- (Optional) Add additional drives as needed.
- Restore your data by moving files back to the pool.
Adding drives to create a multi-device pool
Once your pool is formatted as BTRFS or ZFS, you can add more drives for redundancy and to expand storage. For detailed instructions on adding disks to existing pools, see Adding disks to a pool.
To add more drives for redundancy:
- Stop the array.
- In the Main tab, assign one or more new devices to your pool.
- Start the array.
- Unraid automatically incorporates the new devices and starts a balance (BTRFS) or resilver (ZFS).
- In the Main tab, click the first pool device and check Balance Status (BTRFS) or zpool status (ZFS) to follow progress.
- When complete, the pool operates in multi-device mode with enhanced capacity and redundancy.
You can use the BTRFS Disk Usage Calculator to estimate available space and redundancy based on your chosen RAID level and device sizes.
Adding disks to a pool
As your storage needs grow, you may want to expand your cache pool by adding additional disks. This process allows you to increase both capacity and performance while maintaining data protection through RAID configurations.
If you want to add disks to your pool, make sure your pool is already formatted as BTRFS or ZFS. If it's not, you'll need to format it first, as explained in Converting a pool to BTRFS or ZFS.
BTRFS pools
To add a disk to a BTRFS pool:
- Stop the array.
- In the Main tab, open the pool.
- In the Pool Devices section, set Slots to the exact number of additional devices.
- Assign the new devices to the available slots.
- Start the array to enable the changes.
After starting the array, BTRFS automatically begins a Balance operation to redistribute data across all devices in the pool. This process may take several hours or even days, depending on the size of your pool and the amount of data stored. During this time, your pool may appear busy, but you can continue using it normally. You can monitor the Balance progress in the Main tab by clicking the first pool device and checking Balance Status.
ZFS pools
Expanding ZFS pools depends on your type of pool configuration:
- Single-vdev RAIDZ1/2/3 pools: A pool with one group of drives in a RAIDZ configuration. Can be expanded one drive at a time. See RAIDZ expansion below.
- Mirrored pools: A pool where drives are paired together in mirrors. Can add additional mirror pairs to increase capacity.
- Multi-vdev pools: A pool with multiple groups of drives (e.g., multiple RAIDZ groups or multiple mirror pairs). Cannot be expanded by adding individual drives to existing groups.
Not all ZFS pools can be expanded by adding devices. Only single-vdev RAIDZ1/2/3 pools allow for one-drive-at-a-time expansion. Other pool configurations require you to add complete vdevs, such as adding a new mirror pair to a mirrored pool or adding a new vdev of the same width to a RAIDZ pool.
If you're creating a new two-device ZFS pool and plan to expand it later by adding drives one at a time, choose RAIDZ1 during initial setup instead of the default mirrored configuration. While two-device pools default to mirrored (which provides redundancy), choosing RAIDZ1 allows you to expand the pool incrementally in the future without migrating your data. If you're not planning to expand beyond two drives, the default mirrored configuration is recommended for its simplicity and performance.
RAIDZ expansion
Starting with Unraid 7.2, you can expand single-vdev RAIDZ1/2/3 pools one drive at a time. This feature allows you to grow your pool capacity incrementally without rebuilding the entire pool.
To expand a single-vdev RAIDZ pool:
- With the array running, on Main → Pool Devices, select the pool name to view the details.
- In the Pool Status area, check for an Upgrade Pool button. If one exists, you'll need to click that before continuing. Note that upgrading the pool will limit your ability to downgrade to earlier releases of Unraid.
- Stop the array.
- On Main → Pool Devices, add a slot to the pool.
- Select the appropriate drive (must be at least as large as the smallest drive in the pool).
- Start the array.
If you see an "invalid expansion" warning, the pool needs to be upgraded first using the Upgrade Pool button mentioned in step 2.
Removing disks from a pool
Removing a disk from a BTRFS or ZFS multi-device cache pool can help you reclaim hardware, replace a failing drive, or reconfigure your storage. This process is only possible if your pool is set up for redundancy (like RAID 1 for both data and metadata) and the remaining devices have enough space to hold all of your data.
Using the WebGUI
- You can only remove one drive at a time using the GUI.
- The GUI currently only supports removing devices if your pool is set up for RAID 1 (for both data and metadata for BTRFS).
- To check your pool's RAID level, navigate to the Main tab and click on the pool. Scroll down to the Balance Status section (for BTRFS) or ZFS pool status (for ZFS).
To remove a disk using the WebGUI:
- Stop the array: Go to the Main tab and look for the option to stop your array.
- Unassign the pool drive: Find the drive you want to remove and unassign it in the Main tab.
- Start the array: Restart the array to apply the changes.
- Verify removal: Click on the first pool device in the Main tab, then check Balance Status (for BTRFS) or zpool status (for ZFS) to confirm the device was correctly removed.
Keep in mind that removing a drive and rebalancing the pool may take several hours, depending on how much data you have and your device speeds.
Using the command line (Advanced)
If you're comfortable with the command line, this method gives you more control and can be useful if the WebGUI option isn't available. For more information on using the command line interface, see Command line interface.
To remove a disk using the command line:
-
Make sure the array is running and open your command line interface.
-
Type the command below, replacing
Xwith the letter corresponding to the drive you want to remove (as shown in the Main tab):btrfs device remove /dev/sdX1 /mnt/cache- For encrypted devices, use:
/dev/mapper/sdX1. - For NVMe devices, use:
nvmeXn1p1.
- For encrypted devices, use:
-
Wait for completion: The device will be removed once you see the cursor return.
-
Make Unraid "forget" the deleted member:
-
Stop the array again, reassign all remaining pool members except the removed device, and then start the array.
To remove multiple devices:
You can do so in one command:
btrfs device remove /dev/sdX1 /dev/sdY1 /mnt/cache
However, keep in mind that the removal will still occur one at a time.
Similar to the WebGUI method, removing devices and rebalancing may take several hours depending on data volume and device speed.
If you have only one device left in the pool, you will need to convert the RAID profile to single to ensure everything functions correctly. For further instructions, refer to the section on Switching the Pool RAID Level to Single.
Changing pool RAID levels
BTRFS provides the ability to change RAID levels for cache pools dynamically, allowing you to adjust settings without stopping the array or losing any data. This flexibility lets you optimize for performance, redundancy, or storage efficiency as your requirements change. For information on adding disks to BTRFS pools, see BTRFS pools.
Supported RAID Levels
| RAID Level | Data Protection | Space Efficiency | Use Case |
|---|---|---|---|
| Single | None | 100% | Temporary storage or non-critical data where redundancy isn't needed. |
| RAID 0 | None | 100% | Maximizes performance and capacity, but not recommended for critical data. |
| RAID 1 | 1 disk failure | 50% | Default for Unraid pools. Ideal for Docker/VM storage and critical data. |
| RAID 10 | 1 disk failure | 50% | Combines RAID 0 speed with RAID 1 redundancy for high-performance needs. |
| RAID 5* | 1 disk failure | 67-94% | Experimental. Balances capacity and redundancy for large media storage. |
| RAID 6* | 2 disk failures | 50-88% | Experimental. Provides extra protection for archival storage with large drives. |
To change a pool's RAID level:
- Start the array in normal mode.
- In the Main tab, click the pool name.
- Scroll to Balance Status to view current RAID levels for data and metadata.
- Select the new RAID profile from the drop-down.
- Click Balance to begin the conversion.
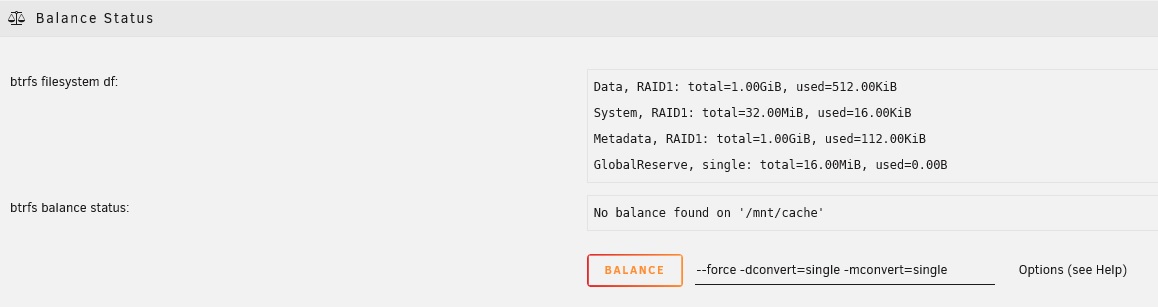
Example: Converting from RAID 1 to Single profile
- Monitor progress in the WebGUI.
Balance operations can take several hours to days, depending on the amount of data in the pool, drive speeds, and the complexity of the selected RAID level.
Troubleshooting balance operations if stuck - Click to expand/collapse
If a balance operation seems stuck or unresponsive, follow these steps:
- In Tools → Logs, filter for
btrfsentries. - Stop and resume the operation:
- Click Cancel Balance.
- Restart the array.
- Initiate the balance operation again.
- Run SMART tests on all devices in the pool. For more information on disk health monitoring, see SMART reports and disk health.
- Ensure there is at least 10-15% free space available on the pool.
- If issues persist, share the logs on the Unraid forums. For guidance on capturing diagnostics, see Capture diagnostics and logs.
For advanced BTRFS configuration details, refer to the BTRFS wiki.
Replace a disk in a pool
Replacing a disk in your cache pool is an important task that helps maintain the performance and reliability of your storage system.
- Check your pool configuration: Make sure your pool is set up with a redundant RAID profile, like RAID 1. You can do this by going to Main → Pool → Balance Status (for BTRFS) or ZFS pool status (for ZFS) in your management interface.
- Choose the right replacement disk: The new disk must be the same size or larger than the one you're replacing.
- Hot-swap capability: If your hardware supports hot-swapping, you won't need to power down your system to replace the disk.
To replace a disk in a pool:
- In the Main tab, stop the array (Array Operation → Stop).
- (Optional) If you don’t have hot-swap, physically remove the old disk.
- Install the replacement disk and ensure proper connection.
- Refresh the Main tab to detect the new disk.
- Assign the new disk to the previous slot.
- Start the array.
- Monitor the rebuild progress in the WebGUI.
Rebuilding can take some time, depending on the size of the disk and the current load on your system. For example, rebuilding a 4TB SSD in a RAID 1 setup may take approximately 3-6 hours. It's a good idea to plan this when you can allow the system to work uninterrupted.
Minimum free space for a cache pool
Setting a minimum free space for your cache pool can provide better control over file placement, especially when dealing with large files like high-resolution videos. This setting helps Unraid know when to stop writing to the pool and start writing directly to the larger storage array, avoiding interruptions or data corruption.
If you often download files around 10 GB, set the minimum free space to at least 10 GB, but ideally 20 GB to allow for adjustments.
You can access Minimum free space by clicking on the pool name in the Main tab and going to Individual Pool Settings.
How it works
- When you transfer a file to a share that includes a pool, Unraid will respect the first floor setting it encounters (either the share's minimum free space or the pool's minimum free space, whichever is reached first).
- The minimum free space setting tells Unraid to stop using the cache pool when free space drops below this amount.
- If your share uses a cache pool as Primary storage, files go to the pool until it reaches the minimum free space, then they are sent directly to the array.
- If set to use a cache pool exclusively (no Secondary storage), this setting is not applied.
- If set to use only the array as Primary storage, files go straight to the array.
Media share has the floor set to 20GB, which is appropriate for the files in that share. However, if you also use the pool for a VM and want to leave a cushion in case the vdisk grows, you could set the pool floor to 50GB. This way, any transfer to the Media share after the pool has less than 50GB free would go directly to the array.
Set the minimum free space to at least the size of the largest file you expect, preferably double that size. For example, if your largest file is 30 GB, set the minimum to 60 GB.
Do not set the minimum free space to 0. This can cause disk full errors. Always use a reasonable value.
Moving files between a pool and the array
There are times when you may need to move files between your cache pool and the main array, such as when preparing for maintenance, upgrading hardware, or optimizing performance. This process is also useful for backing up your cache pool before making configuration changes or replacing drives. Unraid provides a built-in tool called Mover to automate this process for user shares.
Move from pool to array
Moving files off the cache pool to the array before performing maintenance or upgrades to ensure your data is safe.
To move files from your pool to the array:
- Go to Settings and turn off Docker and VM Manager. This prevents any files from being held open, allowing the Mover to transfer everything smoothly.
- In the Shares tab, for each share you want to move (like
appdataorsystem), set Primary storage to the source cache pool and Secondary storage to the array. Set Mover action to cache → array. - Go to the Main tab and click Move Now to transfer files from the cache pool to the array.
- After the Mover finishes, check that the files have been moved by clicking the folder icon next to the cache entry on the Main tab.
- Once all files are on the array, you can safely turn Docker and VM services back on.
Move from array to pool
Moving files back to the cache pool after maintenance or when you've added a new cache device to improve performance.
To move files from the array to a pool:
- Go to Settings and turn off Docker and VM Manager to prevent any open files from interfering.
- In the Shares tab, for each share you want to move (like
appdataorsystem), set Primary storage to the destination cache pool and Secondary storage to the array. Set Mover action to array → cache. - Go to the Main tab and click Move Now to start moving files from the array to the cache pool.
- After the Mover finishes, check that the files are now on the cache pool.
- Once the move is complete, turn Docker and VM Manager back on in Settings.
- (Optional) To set a share to use cache pool exclusively: If you want all files for a share to remain on the cache pool, set the Primary storage to your cache pool and Secondary storage to None for that share.
Why do files sometimes end up in the wrong pool or cache? - Click to expand/collapse
When you move files between user shares at the Linux level (for example, using mv or within a Docker container), Linux tries to optimize the operation. If both the source and destination appear on the same mount point (/mnt/user), Linux might rename the file instead of moving it. This can result in files remaining on the original disk or pool, even if the share's "Use cache" setting is set to "No."
To ensure that files move as intended, consider the following options:
- Use the Mover tool.
- Copy files and then delete the originals.
- Move files over the network.
These methods help prevent files from ending up in the wrong location.
Multiple pools
Unraid allows you to create and manage up to 34 separate storage pools, each with up to 200 devices. Multiple pools give you flexibility to allocate storage for different tasks, improve performance, and customize redundancy based on your needs. Each pool can use a different file system, RAID level, and device type (SSD, HDD, NVMe, etc.).
Why use multiple pools?
- Optimize performance: Separate pools for VMs, Docker containers, downloads, or media can enhance speed and reduce conflicts.
- Protect data: Assign different RAID levels or file systems to each pool for tailored redundancy and backup options.
- Isolate workloads: Keep critical applications on faster, redundant pools and store bulk data on larger, cost-effective devices.
- Manage flexibly: You can expand, reduce, or format pools independently without impacting others.
Common use cases
| Use case | Configuration example | Benefit |
|---|---|---|
| High-performance VMs | NVMe SSD pool, RAID 1, BTRFS or ZFS | Fast I/O with redundancy |
| Docker/Appdata storage | SSD pool, RAID 1, BTRFS or ZFS | Quick access and data protection |
| Bulk media downloads | Large HDD pool, RAID 0 or single, XFS/BTRFS | High capacity with less redundancy |
| Project/Team isolation | Separate pools for each team/project | Reduces resource conflicts |
| Snapshots and backup targets | ZFS pool, RAIDZ1/RAIDZ2 (multi-device) | Supports native snapshots and backups |
- BTRFS: Best for multi-device pools (supports RAID 0, RAID 1, RAID 10, RAID 5, RAID 6).
- ZFS: Excellent for both single and multi-device pools (Unraid 6.12+), with mature support for RAIDZ1 and RAIDZ2. For advanced ZFS features and configuration, see ZFS storage.
- XFS: Suitable for single-device pools.
When accessing a user share from multiple pools and array disks, Unraid merges the directory listings in this order:
- Pool assigned to the share
- Array disks (disk1, disk2, ..., disk28)
- Other pools (in order)
Moving files between pools
Unraid doesn't allow direct file movement between pools through the WebGUI, but you can do it using the Mover tool or via command line.
If any of the files belong to a Docker container and/or VM, the services must be disabled for the files to be moved successfully.
Using Mover
- Go to Settings and turn off Docker and VM Manager to prevent open files.
- Move files from pool1 to the array (cache → array):
- Move files from the array to pool2 (array → cache):
- Re-enable Docker and VM services (if needed).
Moving large data sets can take hours, depending on file size and device speeds.
Manual file transfer (Advanced)
- Disable Docker and VM services as described above.
- Use
rsyncormvcommands to transfer files between mount points (e.g.,/mnt/pool1/shareto/mnt/pool2/share). - Verify the files before deleting them from the original pool.
- Re-enable Docker and VM services.
Always check your file paths and use the correct share names to prevent data loss.