Apple Time Machine
Apple’s Time Machine is a backup tool that comes with every Mac. It makes it easy to protect your files, applications, and system settings by automatically backing them up. By connecting Time Machine to your Unraid server, you can store these backups securely on your own hardware. This setup not only gives you more control but also allows for easier scalability and added peace of mind.
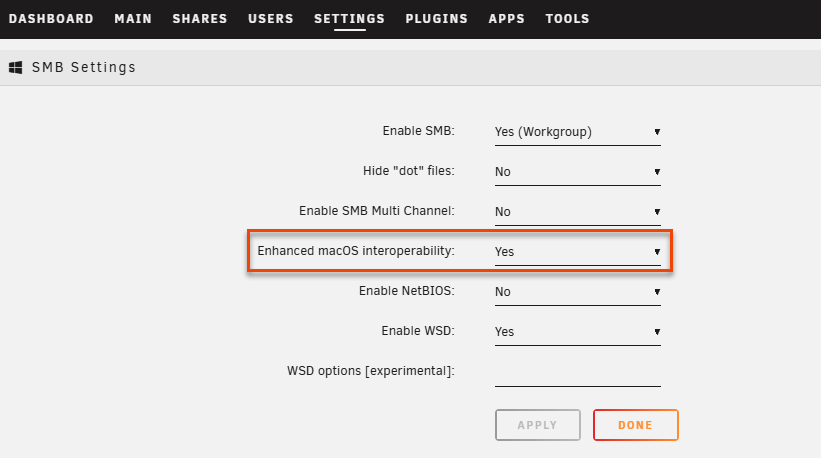
This guide applies to macOS Ventura (13.x), Sonoma (14.x), and Sequoia (15.x) versions. Some features, such as SMB enhancements and Time Machine support over SMB, require macOS versions that support these protocols.
For the best results, keep your Mac updated to the latest version of macOS that is compatible with your hardware.
Some users report intermittent issues with Time Machine and network shares on macOS Sequoia. If you experience backup failures, consider using the Time Machine Docker container as an alternative.
Creating a Time Machine share
To create a Time Machine share:
-
In the WebGUI, go to Shares and click Add user share.
-
Configure the following settings:
Setting Description User share name Name your user share (e.g., Time Machine). Minimum free space Set to 1 (1 KB) for best results. This prevents Time Machine from failing when disks approach capacity. Included disk(s) Select the disk(s) in the array to use for the Time Machine user share. Enable copy-on-write Keep at Auto for best performance. SMB export Set to Yes (Time Machine) to enable Time Machine support. Time Machine volume size Set to your desired maximum size, or leave unset. If not setting minimum free space to 1, apply the share first, then re-edit and set volume size to less than the calculated minimum free space that appears. Security settings Configure SMB security parameters as desired. -
Click Apply to create the user share.
For more details on creating and managing shares, see User shares.
Connect from macOS
To connect to your user share from your Mac:
- In Finder, press Command + K to open the "Connect to Server" window.
- Enter the SMB address of your Unraid server. For example, use the format
smb://[server-ip]/[Time Machine share name]and click Connect. - When prompted, input your Unraid username and password that has access to the share, then click Connect.
- Open System Settings if you're using macOS Ventura 13.0 or later, or System Preferences if you're on macOS Monterey 12.x or earlier. Then navigate to Time Machine.
- Click on Select Disk or Add Backup Disk, choose your Unraid Time Machine user share, and then click Use Disk.
- (Optional) If you want to secure your backup with a password, enable Encrypt backups.
- If prompted, confirm the connection and re-enter your Unraid root user credentials if needed.
- Time Machine will start the initial backup automatically. Keep in mind that the first backup may take a while, but future backups will be faster since they are incremental.
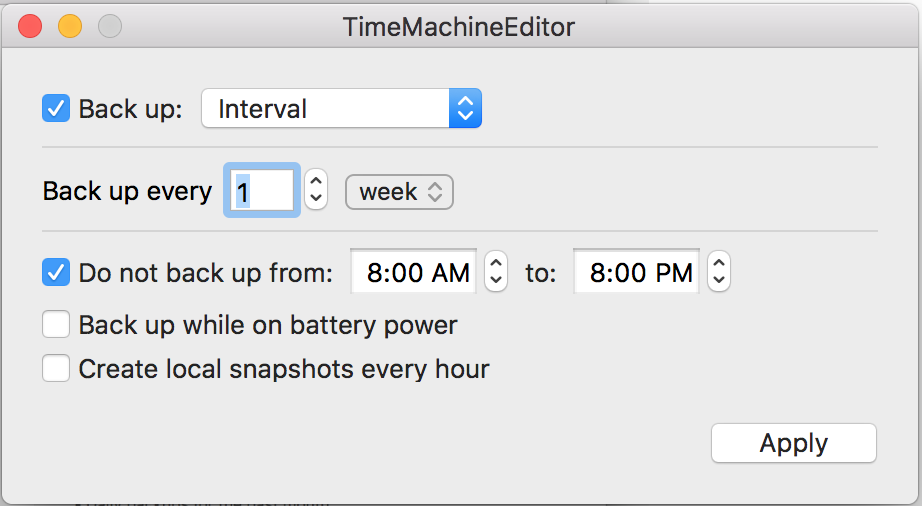
For more control over backup scheduling and options, consider using a third-party tool like Time Machine Editor.
Multiple Time Machine setups
For families or settings with multiple Macs, this method offers clear separation of backups, enhances security, and simplifies management.
To create separate backups for different users or Macs on your Unraid server:
-
Create unique Unraid root user accounts for each person or Mac that will back up data. For example, users named
larry,curly, andmoe. This ensures that each user has their own identity and permissions. -
Create individual Time Machine user shares for each user, naming them clearly to match the user, such as
tm-larry,tm-curly, andtm-moe. Keeping shares separate helps with managing storage and access for each user. -
Assign appropriate user permissions for each user share:
- Set the user share's SMB security settings to ensure that only the corresponding user has access.
- Confirm that only the intended user can read and write to their Time Machine user share.
-
Configure Time Machine on each Mac to connect to its designated user share:
- On each Mac, connect to the Unraid server using the SMB path for their specific user share (e.g.,
smb://unraid-server/tm-larry). - Follow the usual Time Machine setup steps to select the user share as the backup disk.
- On each Mac, connect to the Unraid server using the SMB path for their specific user share (e.g.,
-
Monitor and manage storage usage:
- You can optionally set volume size limits on each Time Machine user share to prevent one user from taking up too much space.
- Regularly check usage and adjust quotas as necessary.
For more information on user management and security, see User management.
Troubleshooting
If Time Machine backups fail or become unreliable:
- Try the Time Machine Docker container: Available through Community Applications, this option can provide more stable backups than direct SMB user shares.
- Check macOS firewall: Temporarily disable the firewall to see if it's blocking connections.
- Create a fresh backup destination: Delete and recreate the Time Machine user share if issues continue.
For additional troubleshooting help, see Troubleshooting or visit the Unraid forums.