Windows on a VM
Windows is one of the most popular guest operating systems for Unraid users, especially for gaming, productivity, and support for legacy applications. Here are essential considerations for running Windows VM.
- Microsoft ended support for Windows 7 in Jan. 2020, Windows 8.1 in January 2023, and Windows 10 in October 2025. Use Windows 11 (or later) or Server 2022 (or later) for ongoing security updates.
- Always test VM stability before activating your Windows license.
- For GPU passthrough, use OVMF (UEFI) BIOS with Windows 11 or newer.
Supported configurations
| Windows edition | Recommended BIOS | Machine type | Notes |
|---|---|---|---|
| Windows 11 | OVMF TPM | Q35 | Requires TPM 2.0 emulation |
| Windows Server 2022 | OVMF | Q35 | Ideal for enterprise workloads |
| Windows 10 | OVMF | Q35 | Deprecated (EOL Oct 2025) |
| Windows Server 2019 | OVMF | i440fx/Q35 | Compatible but not recommended |
VirtIO driver management
Windows requires paravirtualized drivers for optimal performance with Unraid’s virtualization stack.
To install or update drivers:
- Automatic installation
- Manual update
-
Download the latest stable VirtIO drivers ISO and save it to your Unraid
isosshare.Verify download integrityDownload the CHECKSUM file from the same directory to verify the ISO's integrity. This helps ensure your download is complete and hasn't been tampered with.
-
Edit your VM settings to point to the new ISO in the
isosshare. -
In Windows Device Manager:
- Right-click devices with yellow warnings
- Select Update driver → Browse my computer
- Navigate to the VirtIO ISO drive (usually
D:\orE:\)
-
Reboot after updating all drivers.
Using Unraid 7 or later, you can automatically inject VirtIO drivers during the Windows installation. Enable this in VM Settings → Advanced Options.
Setting up hibernation
Hibernation lets you save your entire Windows VM state - including open applications and documents - to disk. This allows you to power off the VM without losing any work. When you resume, Windows restores everything exactly as you left it, skipping the normal boot process. This feature is handy when you need to reboot or power down your Unraid host or want to save energy while keeping your VM's state intact.
- Save energy by powering down idle VM without losing progress
- Quickly resume work after host maintenance or updates
- Reduce wear on SSDs compared to frequent complete shutdowns and reboots
To use hibernation reliably, you must install the QEMU Guest Agent in your Windows VM. This agent allows Unraid to communicate with the VM for advanced operations like hibernation, shutdown, and live statistics reporting.
How to install the QEMU Guest Agent - Click to expand/collapse
How to enable hibernation in Windows - Click to expand/collapse
- Open Control Panel and search for Power Options.
- Click on Choose what the power buttons do.
- Click Change settings that are currently unavailable to unlock shutdown settings.
- Check the Hibernate option.
- Click Save changes.
The Hibernate option will now appear in the Windows Power menu.
If your VM fails to hibernate or resume properly, you may lose unsaved work or face a failed restore. Always save important data before hibernating. If issues persist, ensure the QEMU Guest Agent is installed and updated, and check the Windows event log for errors.
Performance tuning
Optimizing your Windows VM can improve responsiveness, reduce disk usage, and avoid common issues with device passthrough or shutdown. These adjustments are optional and can be applied as needed.
Disable fast startup
Disabling fast startup can help prevent issues with device passthrough. It ensures your VM hardware initializes correctly every time it boots. While this setting is designed for physical PCs, in a virtual environment, it can often cause more problems than benefits.
How to disable Fast Startup - Click to expand/collapse
- Open Control Panel and search for Power.
- Click on Choose what the power buttons do.
- Click Change settings that are currently unavailable.
- Uncheck Turn on fast startup under Shutdown settings.
- Click Save changes.
Disable hiberfil.sys
Hibernation in Windows creates a large hidden file called hiberfil.sys. This file can consume significant disk space and increase disk activity in your VM. If you don't rely on hibernation, disabling it will free up storage and reduce unnecessary I/O activity.
How to disable hibernation and remove hiberfil.sys - Click to expand/collapse
- Right-click the Start button and select Windows Terminal (Admin) or Command Prompt (Admin).
- Type:
powercfg /h off - Press Enter and reboot your VM. The
hiberfil.sysfile will be removed from your C:\ drive.
Disable Windows indexing
Windows Search indexing continuously scans your virtual machine's storage to catalog files for faster search results. However, on a virtual machine, this can cause unnecessary disk I/O, slow down performance, and increase wear on your physical storage, especially SSDs in your cache pool.
How to disable Windows indexing - Click to expand/collapse
- Press Windows + R to open the Run dialog, type
services.msc, and press Enter. - In the Services window, scroll down and right-click Windows Search, then select Stop.
- Double-click Windows Search, change Startup type to Disabled, and click OK.
Disable automatic disk defragmenting
Windows is designed to defrag physical hard drives on a regular schedule automatically. On a VM - especially when using SSD storage or thin-provisioned vDisks - automatic defragmenting is unnecessary and can also reduce disk lifespan and degrade performance.
How to disable automatic disk defragmenting - Click to expand/collapse
- Open File Explorer, right-click the C: drive, and select Properties.
- Go to the Tools tab and click Optimize.
- Click Change settings.
- Uncheck Run on a schedule and click OK.
Enable high-performance power mode
Power management features in Windows are designed for laptops and desktops to save energy. In a VM environment, these features can unnecessarily throttle performance or suspend your VM, making it less responsive and harder to manage.
Enabling High Performance mode ensures your VM always runs at full speed and is less likely to pause or suspend unexpectedly.
How to enable high performance power mode - Click to expand/collapse
- Open Control Panel and search for "power."
- Click Choose a power plan.
- Select High performance under Preferred plans.
Enable remote desktop access
Remote desktop protocol (RDP) allows you to access your Windows VM from another device. It offers better performance and compatibility compared to VNC. Note that RDP is supported only on Windows Professional and Enterprise editions. Also, your Windows user account must have a password set.
RDP is not available on Windows Home editions. Always set a secure password for your Windows user account before enabling RDP.
How to enable remote desktop (RDP) access - Click to expand/collapse
To enable RDP access, follow these steps:
- Press Windows + I to open Settings, then navigate to System → About and click Advanced system settings.
- In the System Properties window, click the Remote tab, then select Enable Remote Desktop.
- Click OK to confirm the changes.
- From your client device, use a Microsoft RDP client to connect to the IP address of the VM (not the Unraid server).
Official Microsoft RDP clients are available for Windows, Mac, Android, and iOS. Make sure your VM is on a network bridge that allows LAN access.
Fix HDMI audio with MSI interrupts
If you're having trouble with HDMI audio in a Windows VM that uses GPU passthrough (which often occurs with NVIDIA graphics cards), enabling Message Signaled Interrupts (MSI) might help. MSI enhances the way interrupts are managed for passed-through devices.
How to enable MSI interrupts - Click to expand/collapse
Back up your VM before making any registry changes. Incorrect modifications can cause system instability.
-
Verify MSI capability:
- Start your VM with GPU passthrough enabled.
- Access Unraid via WebTerminal or SSH.
- Run the command
lspci -v -s 01:00.0(replace01:00.0with your GPU's PCI address). - Look for the line:
Capabilities: [68] MSI: Enable+ Count=1/1 Maskable- 64bit+.
-
Enable MSI in Windows:
- If MSI shows
Enable-, follow Microsoft's guide or use the MSI Mode Utility to modify your Windows registry settings. - Reboot the VM after making the changes.
- If MSI shows
For more technical details, see VFIO interrupts explained.
Upgrading to Windows 11
Windows 11 requires TPM 2.0 and Secure Boot. Unraid's OVMF-TPM BIOS provides the virtual TPM support needed for these requirements.
- Create a complete backup of your VM.
- Ensure that Unraid is running version 6.10 or later.
- Verify that your Windows 10 VM meets the Windows 11 system requirements.
To add TPM support:
- Shut down your Windows 10 VM.
- Edit the VM settings.
- Change BIOS from OVMF to OVMF-TPM.
- Save the changes and start the VM.
Upgrade methods
- In-place upgrade
- Clean install
- Download the Windows 11 Installation Assistant.
- Run the installer and follow the on-screen instructions.
- Reboot when prompted.
- Download the Windows 11 ISO.
- Upload the ISO to your
isosshare on your Unraid server. - Modify your VM template to boot from the ISO in the
isosshare. - Boot the VM from the ISO and perform the fresh installation.
- Reinstall your applications and restore your data from backup.
Expanding Windows VM vDisk partitions
After you expand your vDisk following the steps in Expand a vDisk, you may encounter an issue where Windows’ default recovery partition blocks you from easily expanding your system (C:) partition to utilize the new space. To resolve this issue, you need to delete the recovery partition and then use Windows Disk Management to expand the partition.
After you complete the initial vDisk expansion:
- Start your Windows VM.
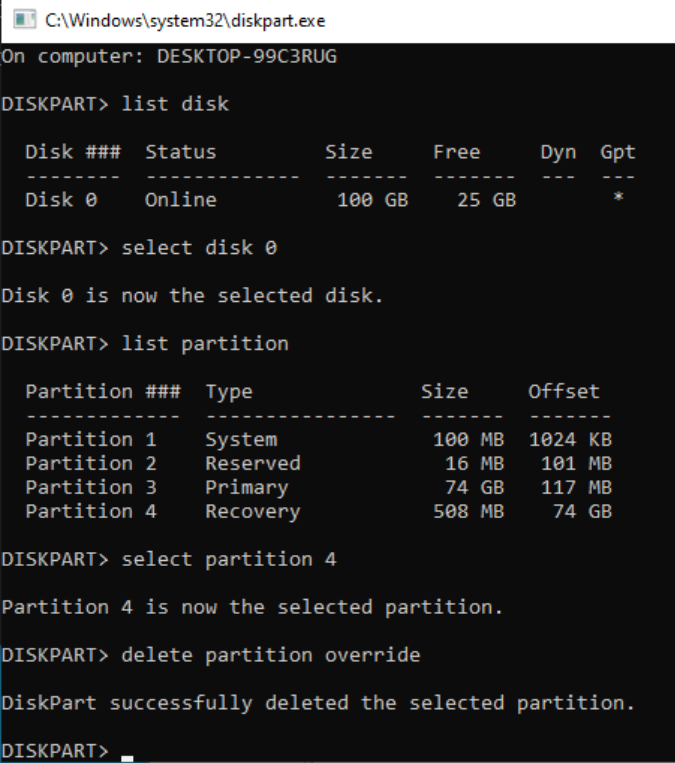
- Open command prompt: Press the Windows key, type
cmd, and hit Enter. - Launch diskpart: Type
diskpartand press Enter. - List disks: Type
list diskand press Enter. - Select the expanded disk: Type
select disk #, replacing#with the correct disk number. - List partitions: Type
list partitionand press Enter. - Identify the recovery partition: Look for the recovery partition that comes after your primary partition.
- Select and delete the recovery partition:
- Type
select partition #, replacing#with the number of the recovery partition. - Type
delete partition overrideand press Enter.
- Type
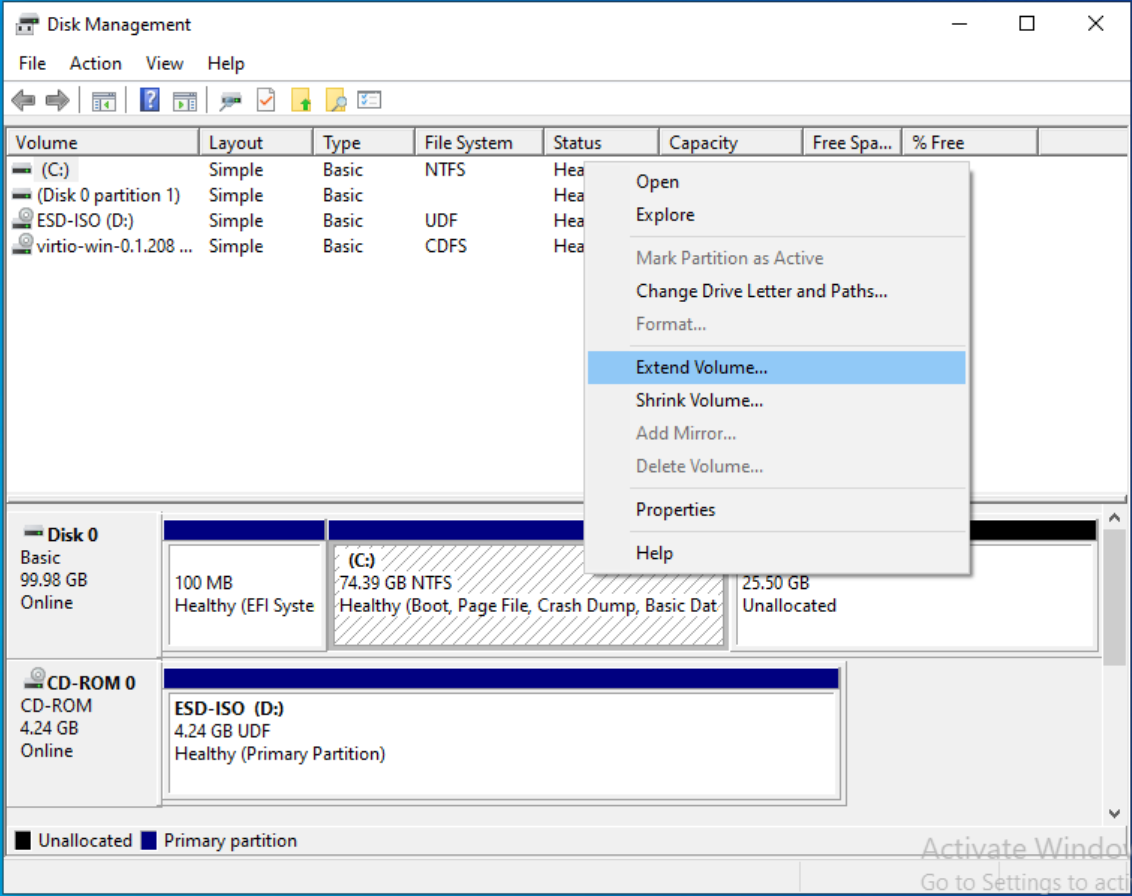
- Expand the C: partition:
- Right-click the Start menu and select Disk Management.
- Right-click the partition you want to extend (usually C:) and choose Extend Volume....
- Follow the prompts to use the unallocated space.
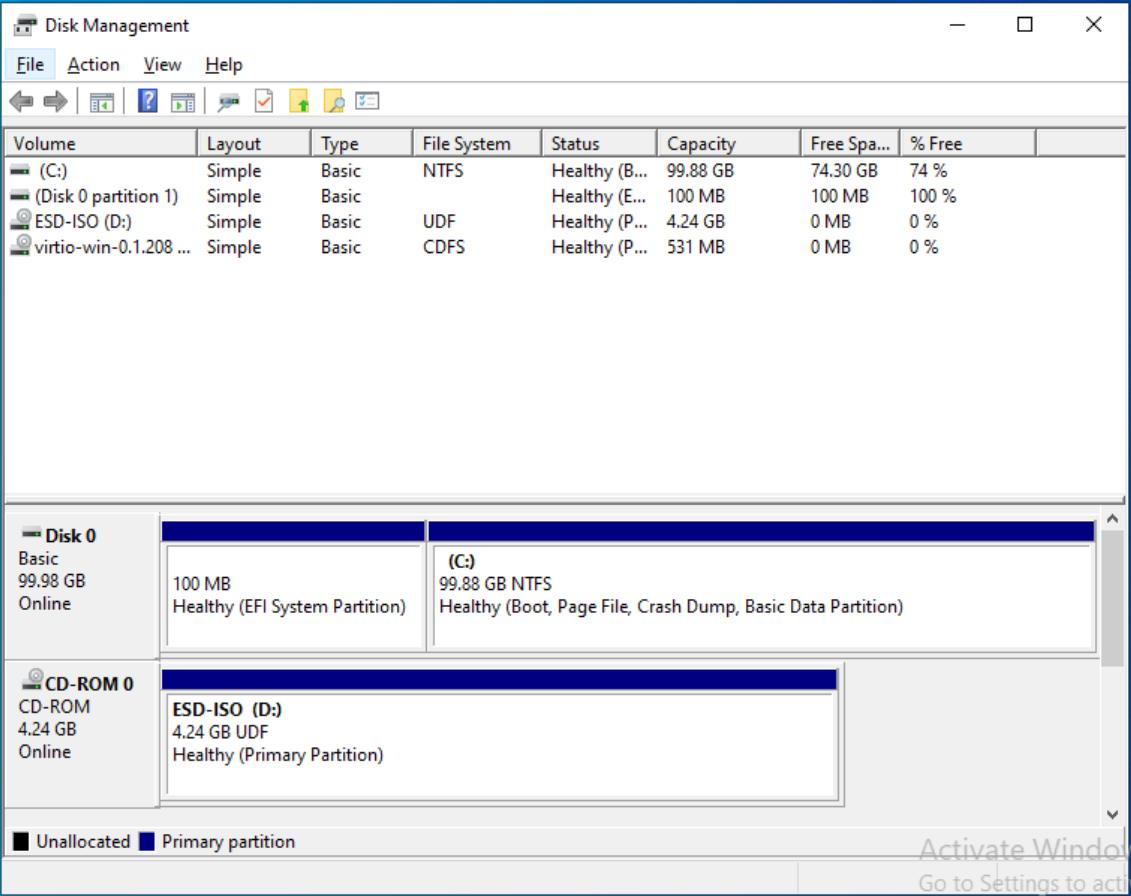
You only need to remove the recovery partition if it blocks access to adjacent free space. If the unallocated space is already next to your C: partition, you can extend it without deleting anything.
Changes made to disk partitions are permanent and cannot be undone. Ensure that your data is securely backed up before deleting any partitions.