WireGuard
While Tailscale provides a user-friendly experience for most, WireGuard is a robust built-in VPN solution in Unraid that shines in specific advanced networking scenarios. It’s particularly useful when you need detailed control over VPN routing or require server-to-server or LAN-to-LAN connections without relying on third-party services. Below are key scenarios where WireGuard excels.
When to choose WireGuard
| Scenario | Why choose WireGuard? |
|---|---|
| Advanced configuration | Allows for custom VPN Tunnel setups and integration with existing network infrastructure |
| Server-to-server tunnels | Lets you create persistent encrypted links between Unraid servers |
| LAN-to-LAN integration | Connects entire networks without involving intermediary services |
| Bandwidth-intensive tasks | Offers minimal protocol overhead for maximum throughput |
For most users, Tailscale can accomplish everything that WireGuard can do, often more easily. It typically doesn’t require port forwarding or manual configuration. However, if you need advanced, custom VPN setups or have specific compatibility requirements, choosing WireGuard may be a better option for some.
Connection types and use cases
Knowing the connection types in WireGuard can help you decide if it's right for you:
| Connection type | Real-world use case |
|---|---|
| Remote access to server | Access Unraid WebGUI, Docker containers, VMs, and network shares remotely. |
| Remote access to LAN | Access all devices on your LAN remotely as if you were on the local network. |
| Server to server access | Securely connect two Unraid servers for data sharing or backup. |
| LAN to LAN access | Seamlessly connect two entire LANs for smooth communication between networks. |
| Server hub & spoke access | Allow multiple VPN clients to connect to each other through the server. |
| LAN hub & spoke access | Enable communication between multiple LANs through a central server. |
| VPN tunneled access | Route specific Docker containers and VMs through a commercial WireGuard VPN provider. |
| Remote tunneled access | Securely route all your internet traffic through your Unraid server when on untrusted networks. |
Setting up WireGuard on Unraid
- Dynamic DNS: Set up DDNS for reliable access if your public IP changes. Popular options include Cloudflare (requires domain ownership), No-IP, or DuckDNS (free but may experience occasional outages).
- Router configuration:
- Client software: Install WireGuard on your devices (Windows, macOS, iOS, Android).
Step 1: Generate keys
- Go to Settings → VPN Manager.
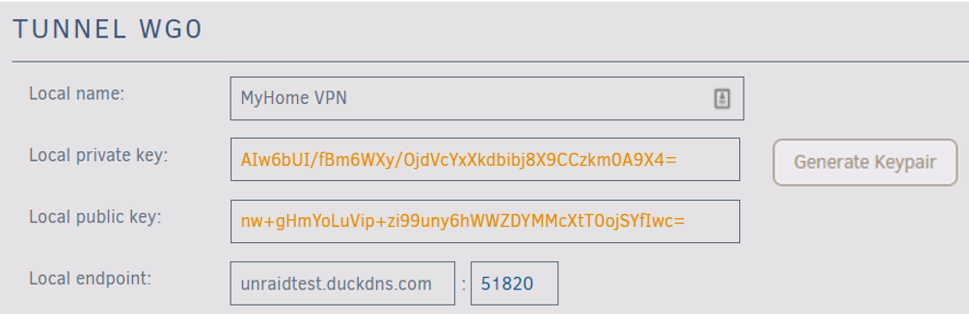
- Name your tunnel (e.g., "Home VPN").
- Click Generate Keypair to create public/private keys.
Store the private key securely since it provides full network access.
Step 2: Configure your endpoint
- For DDNS users: Replace the IP in Local endpoint with your DDNS URL (e.g.,
myhome.duckdns.org). - Keep the default port (
51820) unless it conflicts with existing services.
Step 3: Set up port forwarding
- UPnP users: Unraid will automatically forward ports if enabled in Settings → Management Access.

- Manual setup: If UPnP is unavailable:
- Log into your router.
- Forward UDP port
51820to your Unraid server's LAN IP. - Use the same port for external and internal settings.

Step 4: Activate your tunnel
![]()
- Trusted access only: VPN access is similar to physical network access, so only authorize trusted devices.
- Key management: Never share private keys; treat them like passwords.
- Network segmentation: For complex setups (custom Docker/VMs), isolate VPN traffic using VLANs or separate subnets.
- Regular audits: Review connected devices and access permissions quarterly.
Defining a peer (client)
A peer is a client device - such as a phone, laptop, or another server - that connects to your Unraid WireGuard VPN. Defining a peer means creating a unique identity and securing keys for that device.
- Select Add Peer.
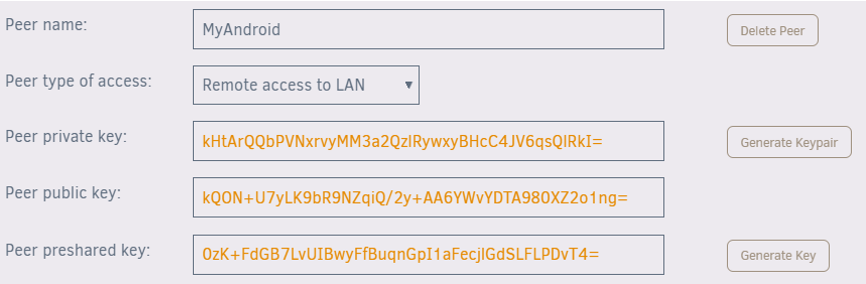
- Name the peer (e.g., MyAndroid).
- Choose the initial connection type for full network access, typically Remote access to LAN.
- Click Generate Keypair to create public and private keys. Keep the private key secure.
- Optionally, generate a preshared key for extra security.
- Click Apply.
While peers can generate their own keys, letting Unraid generate keys simplifies setup by providing complete config files.
Adding a new peer can temporarily disable the WireGuard tunnel, which may interrupt your connection. Ensure you have local access to your server before making changes.
Configuring a peer (client)
- Mobile device
- Other devices
- Select the eye
 icon to view the peer configuration.

- In the WireGuard mobile app, choose Create from QR code and scan the QR code.
- Name the connection and connect. The VPN tunnel should start quickly.
- Keep the QR code private - anyone with it can access your VPN.
- Select the eye icon to view the peer configuration.
- Download the configuration file.
- Securely transfer it to the client device (e.g., via trusted email or cloud storage).
- Unzip and import the configuration into the WireGuard client.
- Protect this file to prevent unauthorized VPN access.
Configuring your DNS
- Access devices using IP addresses or fully qualified domain names (e.g.,
yourpersonalhash.unraid.net).
Short names like "tower" or router-managed DNS entries may not work over the VPN.
- To enable short name resolution:
- Go to Settings → VPN Manager in Unraid.
- Switch from Basic to Advanced mode.
- Enter the IP address of your preferred DNS server in the Peer DNS Server field.
- Save changes and update the client configuration file.
- Recommended DNS servers:
- Your LAN router’s IP address.
- Public DNS servers like
8.8.8.8.
This setup is especially important for Remote tunneled access mode, where the client’s original DNS server may be inaccessible.
Complex networks
For most users, the default Use NAT setting works out of the box and allows access to Unraid and most LAN devices. However, if you use Docker containers with custom IPs or VMs with strict networking requirements:
- In your WireGuard tunnel configuration, set Use NAT to No.
- On your router, add a static route for the WireGuard tunnel network (e.g.,
10.253.0.0/24) pointing to your Unraid server’s IP. - In Settings → Docker Settings, set Host access to custom networks to Enabled.
Configurations to avoid
| Use NAT setting | Host access to custom networks | Server & Dockers (Bridge/Host) | VMs & other LAN systems | Dockers with custom IP | Notes |
|---|---|---|---|---|---|
| Yes | Disabled (Static route optional) | Accessible | Accessible | Not accessible | Simple network setup; recommended for most users |
| Yes | Enabled (Static route optional) | Accessible | Not accessible | Not accessible | Avoid this configuration |
| No | Disabled (No static route) | Accessible | Not accessible | Not accessible | Avoid; requires static route to function properly |
| No | Disabled (With static route) | Accessible | Accessible | Not accessible | Almost correct; enable host access to custom networks |
| No | Enabled (With static route) | Accessible | Accessible | Accessible | Recommended setup for complex networks |
Troubleshooting WireGuard
WireGuard is designed to be unobtrusive - if something isn’t working, it won’t provide error messages. To troubleshoot effectively, you should systematically check each aspect of your setup.
Connection checklist
- ✅ The tunnel is active on both Unraid and client devices. ("Active" means the tunnel has started but is not necessarily connected.)
- ✅ DDNS URL points to your current public IP and is set in Local endpoint.
- ✅ Correct UDP port is forwarded from your router to Unraid, matching the Local endpoint port.
- ✅ Clients have the latest configuration files after any server-side changes.
- ✅ Changes are saved before viewing or distributing peer configs (QR codes/files).
Additional troubleshooting ideas
First-time setup tips - Click to expand/collapse
If you’re setting up WireGuard for the first time, these tips can help you avoid common pitfalls:
- Set up your first client using a mobile device on cellular data (not Wi-Fi) to rule out local network issues.
- Use the QR code method for the easiest configuration transfer.
Handshake and connectivity issues - Click to expand/collapse
If you’re not seeing a handshake or can’t connect, try these targeted checks:
- If you don’t see a handshake, try generating traffic (for example, pinging the server) to trigger the connection.
- Disable energy-saving, data saver, or battery saver features on mobile clients, as these may interfere with VPN operation.
- Ensure that the client and server networks use different subnets (for example, avoid both using
192.168.1.0/24). - If using Cloudflare for DDNS, set Proxy status to DNS only (not Proxied). Allow time for DNS changes to propagate.
- If you can connect from some locations but not others, the remote network may block UDP traffic. WireGuard currently does not support TCP as a fallback.
Advanced network conflicts - Click to expand/collapse
If your network setup is more complex, or you suspect an IP conflict, review these advanced troubleshooting steps:
- In Advanced mode, confirm that your Local tunnel network pool does not overlap with any existing network on either side. If there’s a conflict, change to a different private subnet (for example,
10.10.10.0/24). - For Docker containers with custom IPs or VMs with strict requirements, see the Complex networks section.
Emergency recovery - Click to expand/collapse
* "WireGuard" and the "WireGuard" logo are registered trademarks of Jason A. Donenfeld.