Secure your outgoing communications
The outgoing proxy manager and Tailscale exit nodes provide a way to route Unraid's outgoing communications through secure channels. These tools are useful for bypassing restrictive firewalls, adhering to network policies, or safeguarding your outgoing traffic. While these solutions mainly focus on Unraid's system traffic, there are configuration options to extend their coverage to your broader network.
There are three main methods to secure your outgoing communications:
- Outgoing Proxy Manager - This tool routes HTTP traffic through a proxy server, allowing you to manage and direct your web requests securely.
- Tailscale exit nodes - With Tailscale exit nodes, all your traffic can be routed through Tailscale's mesh network, ensuring a secure connection across your devices.
- WireGuard VPN - You can also use WireGuard VPN to route your traffic through commercial VPN providers, adding an extra layer of privacy and security.
Outgoing Proxy Manager vs. Tailscale/WireGuard/VPN
| Use case | Recommended tool | Why |
|---|---|---|
| Bypass firewall for Unraid system updates | Outgoing Proxy Manager | Routes only Unraid's system traffic through a proxy; simple and minimal configuration. |
| Secure all outgoing traffic with mesh networking | Tailscale exit nodes | Encrypts traffic through Tailscale's mesh network; easy setup with existing Tailscale infrastructure. |
| Secure all outgoing traffic (system-wide) | WireGuard VPN | Encrypts and tunnels all traffic from Unraid (including Docker/VMs) to commercial VPN providers. |
| Isolate Docker or VM traffic | VPN or container proxy | Configure VPN at the container/VM level for granular control. |
| Access home network from anywhere | Tailscale exit nodes | Route traffic through your home network for consistent IP and geo-location. |
For most users, solutions like Tailscale or WireGuard are preferred for full-system security and privacy. Use Outgoing Proxy Manager when you only need to proxy Unraid's own HTTP requests.
Setting up a proxy server
To set up a proxy server:
- Navigate to Settings → Outgoing Proxy Manager in the WebGUI.
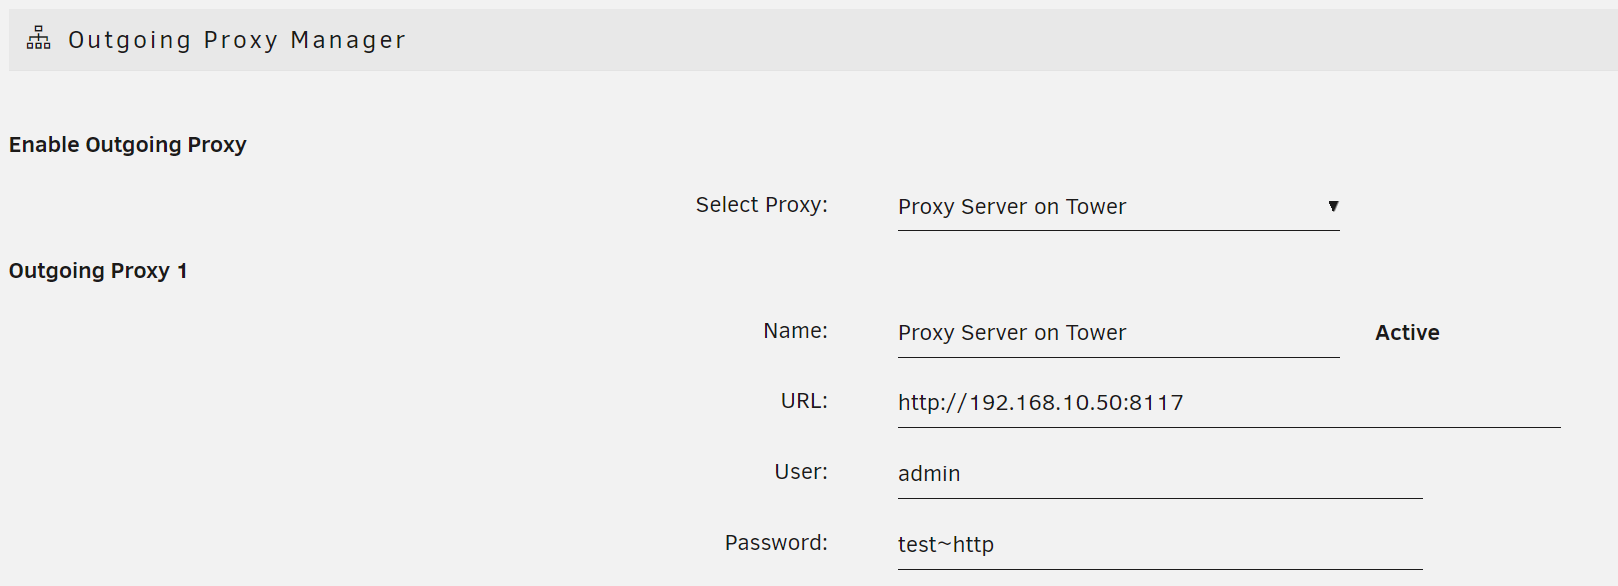
- Add your proxy's name, URL, and (if required) username/password.
- Click Apply.
- Select your new proxy from the list and click Apply again.
The WebGUI will automatically use the selected proxy for outgoing system traffic. If you have open web terminals or SSH sessions, close and reopen them to apply the new proxy settings. This usage is transparent—monitor proxy server logs to verify activity.
Choosing an HTTP proxy server
- If your organization provides a proxy: Use the address and credentials supplied by your network administrator.
- If you need to set up your own:
- The Proxy Server Docker container by @ich777 is tested and works well with Unraid.
- You can configure this container to route traffic through a commercial VPN using Unraid's WireGuard VPN or connect it to another Docker-based VPN service.
- For reliability, host the proxy server on a separate system from Unraid to ensure network availability during boot.
To monitor proxy traffic, go to the Docker tab on the proxy host system, select the Proxy Server container, and view Logs.
Automatic import and plugin compatibility
- If you previously used the Proxy Editor plugin, it will be automatically removed upon upgrading to Unraid 7.0+ with built-in proxy support.
- Legacy proxy settings in your
config/goscript or incommunity.applications/proxy.cfgwill be imported automatically, and the old files will be renamed for safety.
Plugin compatibility
- Plugins using PHP’s
curl_init()function will automatically use the outgoing proxy. - Plugins using
file_get_contents()should migrate tocurl_init()for proxy compatibility. - For command-line processes, prefer
curloverwgetfor proxy support.
For additional information about plugin development and compatibility, visit the Plugins section of the documentation.
Tailscale exit nodes
Tailscale exit nodes offer a secure and modern way to route your Unraid server's outgoing traffic through another device on your Tailnet. This setup provides the security of a VPN while leveraging Tailscale's easy-to-use mesh networking, making it ideal for users who want encrypted outgoing traffic without the complexity of traditional VPNs.
Configuring Tailscale exit nodes
To set up a Tailscale exit node for your server's outgoing traffic:
- Install the Tailscale plugin from Community Applications if it’s not already installed.
- Set up an exit node on your Tailnet. This can be another Unraid server, a Docker container, or any device running Tailscale.
- Configure your Unraid server to use the exit node:
- Navigate to Settings → Tailscale.
- In the Use Exit Node field, select your available exit node.
- Click Apply.
Mullvad integration
Tailscale has teamed up with Mullvad VPN to provide commercial exit nodes. You can purchase Mullvad VPN through Tailscale, gaining access to their global network of servers as exit nodes. This combination offers Tailscale's mesh networking along with Mullvad's privacy-focused infrastructure.
Docker container exit nodes
You can also set up a Docker container to function as a Tailscale exit node on your Unraid server.
- Deploy a Tailscale container using the official Tailscale Docker image.
- Configure the container by adding the
--advertise-exit-nodeflag. - Approve the exit node in your Tailscale admin console.
- Select the container as an exit node for your other devices on the Tailnet.
Outgoing VPN connections
Unraid supports outgoing WireGuard VPN connections to commercial providers, allowing you to route Docker containers or your entire server’s traffic through a secure tunnel. This is useful for privacy, bypassing geo-restrictions, or securing outbound data. For community insights and troubleshooting, see the WireGuard VPN tunneled access forum thread.
Choosing a VPN provider
Selecting the right VPN provider depends on your priorities - speed, privacy, ease of use, and support. The following providers are well-supported by Unraid and offer strong WireGuard integration:
| Provider | Best for | Key features | Support in Unraid | Notes |
|---|---|---|---|---|
| NordVPN | Speed, privacy, value | Double NAT, no-logs, global network | Excellent | NordLynx protocol, fast |
| Surfshark | Budget, unlimited devices | No-logs, unlimited connections, fast speeds | Excellent | Great value, easy setup |
| ProtonVPN | Privacy, open-source | Double NAT, Secure Core, no-logs | Excellent | Open-source, strong privacy |
| Mullvad | Anonymity, simplicity | No personal info, flat pricing, open-source | Excellent | Pay with cash, no email |
| PureVPN | Streaming, flexibility | Large network, easy Unraid integration | Good | Good support, fast speeds |
| CyberGhost | Streaming, ease of use | Optimized servers, fast speeds | Good | User-friendly apps |
| IVPN, OVPN, Windscribe | Niche needs | Advanced privacy, regional options | Good | Community-supported |
Choose a provider with native WireGuard support and strong privacy policies. Avoid providers that require custom clients or proprietary protocols.
Configuring VPN tunneled access for Docker
You can route specific Docker containers through a commercial VPN tunnel - no router changes required.
- Download the WireGuard config file from your chosen provider.
- In Settings → VPN Manager, select Import Config and upload the file. This creates a new tunnel.
- The Peer type of access defaults to VPN tunneled access for Docker. Optionally, give it a local name.
- Click Apply.
- Set the tunnel toggle to Active.
Note the tunnel name (e.g., wg0, wg1, wg2). You’ll need it when configuring Docker containers.
If your provider specifies a DNS server in their config, record it for later use. If not, use a public DNS like 8.8.8.8.
Testing the Docker tunnel
To verify your Docker tunnel is working and not leaking DNS or IP information:
- Install a Firefox Docker container via Community Applications.
- Set its Network Type to Custom: wgX (replace X with your tunnel name).
- Switch to Advanced view and add your DNS provider to Extra Parameters (e.g.,
--dns=8.8.8.8). - Apply changes and start the container.
- Launch Firefox and visit whatismyipaddress.com to verify your IP address matches the VPN server’s country.
- Visit dnsleaktest.com and confirm only your VPN’s DNS servers are detected.
You can assign additional containers to this tunnel or create multiple tunnels.
Configuring VPN tunneled access for the system
To route all Unraid traffic through a commercial VPN:
- Download the WireGuard config from your provider.
- In Settings → VPN Manager, select Import Config and upload the file.
- Optionally, rename the tunnel.
- Click Apply.
- Set the tunnel toggle to Active.
- You may need to disable the tunnel temporarily for Unraid updates or plugin installations.
- Only one system-wide tunnel can be active at a time.
- Unraid ignores DNS settings from the imported config. Set Unraid’s DNS to a reliable public server (e.g.,
8.8.8.8,8.8.4.4).
Testing the system tunnel
- Install the Firefox Docker container.
- Accept all defaults.
- Launch Firefox and visit whatismyipaddress.com. Your IP address should match your VPN provider’s location.
Support and Community Resources
For the most up-to-date guidance, troubleshooting assistance, and community tips, visit the following resources on the Unraid forums:
-
WireGuard VPN Tunneled Access - This community discussion focuses on routing Docker containers or system-wide traffic through commercial WireGuard VPN providers. It includes real-world setup examples, DNS leak testing tips, and troubleshooting advice for outbound tunnels.
-
Dynamix WireGuard Plugin Thread - This is the official thread for the Dynamix WireGuard plugin. It covers plugin updates, feature requests, bug reports, and general questions and answers related to Unraid’s built-in WireGuard support.
-
WireGuard Quickstart - A step-by-step guide for setting up inbound WireGuard VPN connections to Unraid. This resource includes configuration walkthroughs, peer setup instructions, and tips for remote access.
* "WireGuard" and the "WireGuard" logo are registered trademarks of Jason A. Donenfeld.