缓存池
In Unraid, a cache pool is a collection of one or more drives, typically SSDs or high-speed HDDs. These drives temporarily store data before it's moved to your main array. Using cache pools can significantly enhance write speeds, protect your data, and provide dedicated storage for specific tasks like running Docker containers or virtual machines.
Cache pools offer several advantages, making them a valuable addition to your Unraid setup, such as:
-
Faster write speeds: Cache pools allow you to quickly write data to faster drives before it gets transferred to the main array. This greatly enhances perceived performance when saving files.
-
Data protection for cached files: By using multiple drives in a cache pool (like setting them up in RAID 1), you add redundancy. This means your cached data is protected from drive failure before it even reaches the main array.
-
为应用程序优化存储: 将 Docker 容器或 虚拟机 存储在 cache pool 上可以提高其性能,减少对主 array 的磨损,并最大限度地缩短访问频繁使用文件的时间。
-
Flexible and dedicated storage: With multiple cache pools, you can assign specific pools for different tasks. For instance, you could have one pool dedicated to downloads and another for virtual machines, reducing competition for resources and boosting efficiency.
- 多个池: 您可以创建并命名不同的 cache pool,以便根据您的具体需要进行调整。
- SSD 与 HDD: SSD 适合于速度,而 HDD 可用于大型顺序数据处理。此外,HDD 可以延长 SSD 的使用寿命。
- Redundancy matters: To protect your data, use more than one drive in a cache pool. A single drive pool won't protect you from potential drive failure.
- File system choice: The default file system for cache pools is BTRFS, which supports various RAID options for added redundancy and flexibility. For more details on file system selection, see File systems.
- Mover integration: Data written to a cache pool is automatically transferred to your main array based on a schedule you set. This keeps your user shares organized and easy to manage.
- 应用程序性能: 通过将 Docker 容器、应用程序数据和 VM 磁盘放在 cache pool 上,您可以提升访问速度,并最大限度地减少对主存储的压力。
:::
池模式
Unraid cache pools can operate in two main modes: single device mode and multi-device mode. Knowing the difference between these modes will help you find the right balance between performance, flexibility, and data protection for your needs.
单设备模式
在 单设备模式 中,您的 %%cache pool|缓存池%% 仅由一个设备组成。这意味着:
单设备模式很简单。您可以轻松添加或移除设备,但将无法使用诸如冗余或扩展等高级功能。
将缓存池备份到阵列
When you set up a cache pool with more than one device, it enters multi-device mode. Here's what you should know:
- 数据保护: 此模式使用 BTRFS 或 ZFS 来跨设备镜像数据,帮助保护您的缓存数据免受驱动器故障的影响。即使丢失一个设备,您也不会丢失任何数据。
- 混合搭配:您可以添加或移除不同尺寸和类型的设备,包括混合使用SSD和HDD。
- 容量管理: 使用 BTRFS 磁盘使用计算器 来估算基于 RAID 级别和您使用的设备大小将有多少空间。对于 ZFS 池,请使用 ZFS 存储指南 获取配置详细信息。
cache pool 的常见任务包括:
- 数据保护:在进行硬件更改或升级之前保护您的重要文件。
- 防止意外丢失:减少重新格式化或替换设备时丢失数据的风险。
- 轻松恢复:确保在维护后您能快速恢复应用程序和
虚拟机数据。 - Moving files between the pool and the array (see Moving files between a pool and the array)
向多设备池中添加磁盘
Cache pools in Unraid can be expanded from a single device to multiple devices, allowing for increased capacity and redundancy. To take advantage of multi-device mode, your pool must be formatted as BTRFS or ZFS.
将池转换为 BTRFS 或 ZFS
If your cache pool isn't already formatted as BTRFS or ZFS, you can convert it using the following steps.
将池转换为 BTRFS 或 ZFS:
- Back up important content. See Moving files between a pool and the array to move files from your pool to the array.
- 停止array。
- 在主选项卡中,单击池并选择BTRFS或ZFS作为文件系统格式。
- 启动 array。
- 重新启用Docker:进入 设置 → Docker 并重新启用Docker,然后点击 应用。
- 格式化后,您将拥有一个BTRFS或ZFS池(此时为单设备)。
- 重启Docker容器和
虚拟机:最后,启动您希望再次运行的Docker容器或者虚拟机。 - 通过将文件移回池来恢复数据。
向多设备池中添加磁盘
一旦您的池格式化为 BTRFS 或 ZFS,您可以添加更多磁盘来提高冗余度并扩展存储。有关向现有池添加磁盘的详细说明,请参阅添加磁盘到池。
Cache pools in Unraid can be expanded from a single device to multiple devices, allowing for increased capacity and redundancy. To take advantage of multi-device mode, your pool must be formatted as BTRFS or ZFS.
- 停止array。
- 在主选项卡中,为您的池分配一个或多个新设备。
- 启动 array。
- Unraid 自动整合新设备并启动一个平衡(BTRFS)或重新排列(ZFS)。
- 在主选项卡中,单击第一个池设备并检查平衡状态(BTRFS)或zpool 状态(ZFS)以跟踪进度。
- 完成后,池将在多设备模式下运行,增加了容量和冗余。
您可以使用 BTRFS磁盘使用计算器 估算根据您选择的RAID级别和设备尺寸的可用空间与冗余。
防止意外丢失:减少重新格式化或替换设备时丢失数据的风险。
随着您的存储需求增长,您可能希望通过添加额外的硬盘来扩展您的缓存池。此过程使您能够在提高容量和性能的同时,通过 RAID 配置保持数据保护。
如果您想向池中添加磁盘,请确保您的池已经格式化为BTRFS或ZFS。如果没有,您需要首先格式化,如将池转换为 BTRFS 或 ZFS中所述。
BTRFS 池
要向 BTRFS 池中添加磁盘:
ZFS 池
扩展 ZFS 池取决于您的池配置类型:
- Single-vdev RAIDZ1/2/3 pools: A pool with one group of drives in a RAIDZ configuration. Can be expanded one drive at a time. See RAIDZ expansion below.
- 镜像池: 驱动器成对镜像的池。可以添加额外的镜像对以增加容量。
- Multi-vdev pools: A pool with multiple groups of drives (e.g., multiple RAIDZ groups or multiple mirror pairs). Cannot be expanded by adding individual drives to existing groups.
并非所有 ZFS 池都可以通过添加设备进行扩展。只有单vdev RAIDZ1/2/3 池允许一次一个磁盘地扩展。其他池配置需要您添加完整的 vdev,例如向镜像池添加一个新的镜像对或向一个 RAIDZ 池添加一个相同宽度的新 vdev。
如果您正在创建一个新的两设备ZFS池,并计划以后通过一次添加一个驱动器的方式进行扩展,请在初始设置时选择 RAIDZ1,而不是默认的镜像配置。 虽然两个设备池默认为镜像(提供冗余),选择 RAIDZ1 可以让您以后在不迁移数据的情况下逐步扩展池。如果您不打算扩展到两个以上的驱动器,建议使用默认的镜像配置以获得其简单性和性能。
RAIDZ 扩展
Starting with Unraid 7.2, you can expand single-vdev RAIDZ1/2/3 pools one drive at a time. This feature allows you to grow your pool capacity incrementally without rebuilding the entire pool.
To expand a single-vdev RAIDZ pool:
- 当 array 运行时,在 主→池设备中,选择池名称以查看详细信息。
- 在池状态区域,检查是否有升级池按钮。如果存在,在继续之前您需要点击此按钮。注意,升级池会限制您降级到 Unraid 的早期版本的能力。
- 停止array。
- 在 Main → Pool Devices 上,向池添加一个插槽。
- 选择合适的驱动器(至少要与池中最小的驱动器一样大)。
- 启动 array。
如果看到"无效扩展"警告,则需要先使用第二步中提到的升级池按钮升级池。
从池中移除磁盘
Removing a disk from a BTRFS or ZFS multi-device cache pool can help you reclaim hardware, replace a failing drive, or reconfigure your storage. This process is only possible if your pool is set up for redundancy (like RAID 1 for both data and metadata) and the remaining devices have enough space to hold all of your data.
通过 WebGUI
:::
要通过 WebGUI 删除磁盘:
- 停止array:转到主选项卡并查找停止你的array的选项。
- 取消分配池驱动器:在主选项卡中找到要移除的驱动器并取消分配。
- 启动array:重新启动array以应用更改。
- 验证移除:点击主选项卡中的第一个池设备,然后检查平衡状态(适用于BTRFS)或zpool状态(适用于ZFS)以确认设备已正确移除。
:::note[Timing]
请记住,根据数据量和设备速度,删除驱动器和重新平衡池可能需要几个小时。
:::
使用命令行(高级)。
如果您对命令行感到满意,使用此方法可以让您有更多的控制权,并且当 WebGUI 选项不可用时可能非常有用。有关使用命令行接口的更多信息,请参阅命令行接口。
:::
通过命令行移除磁盘:
-
确保 array 正在运行,然后打开命令行界面。
-
在下面输入命令,用想要移除的驱动器对应的字母替换
X(如主选项卡所示):btrfs device remove /dev/sdX1 /mnt/cache- 对于加密设备,使用:
/dev/mapper/sdX1。 - 对于 NVMe 设备,使用:
nvmeXn1p1。
- 对于加密设备,使用:
-
等待完成:当光标返回时,设备将被移除。
-
使 Unraid "忘记" 已删除的成员:
您可以在一个命令中进行:
您可以在一个命令中进行:
btrfs device remove /dev/sdX1 /dev/sdY1 /mnt/cache
不过,请记住移除仍然是一个一个进行的。
:::note[Timing]
与 WebGUI 方法相似,移除设备和再平衡可能需要几个小时,取决于数据量和设备速度。
:::
如果在池中只剩下一个设备,您将需要将 RAID 配置文件转换为 单个 以确保一切正常工作。有关进一步说明,请参考将池RAID级别切换为单个部分。
改变池的 RAID 级别
BTRFS provides the ability to change RAID levels for cache pools dynamically, allowing you to adjust settings without stopping the array or losing any data. This flexibility lets you optimize for performance, redundancy, or storage efficiency as your requirements change. For information on adding disks to BTRFS pools, see BTRFS pools.
支持的 RAID 级别
| RAID 级别 | 数据保护 | 空间效率 | 使用场景 |
|---|---|---|---|
| 单个 | 无 | 100% | 用于临时存储或不需要冗余的非关键数据。 |
| RAID 0 | 无 | 100% | 最大化性能和容量,但不建议用于关键数据。 |
| RAID 1|raid1 | 可承受 1 个磁盘故障 | 50% | Unraid 池的默认值。非常适合 Docker/VM 存储和关键数据。 |
| RAID 10 | 可承受 1 个磁盘故障 | 50% | 结合了RAID 0的速度和RAID 1的冗余以满足高性能需求。 |
| RAID 5* | 可承受 1 个磁盘故障 | 67-94% | 实验性。 适用于大规模媒体存储的容量和冗余的平衡。 |
| RAID 6* | 可承受 2 个磁盘故障 | 50-88% | 实验性。 为大容量硬盘提供额外的归档存储保护。 |
您可以通过点击 主 选项卡中的池名称并转到 个人池设置 来访问最低空闲空间。
- Start the array in normal mode.
- 在主选项卡中,单击池名称。
- 滚动到平衡状态查看当前数据和元数据的RAID级别。
- 从下拉列表中选择新的RAID配置文件。
- 点击平衡以开始转换。
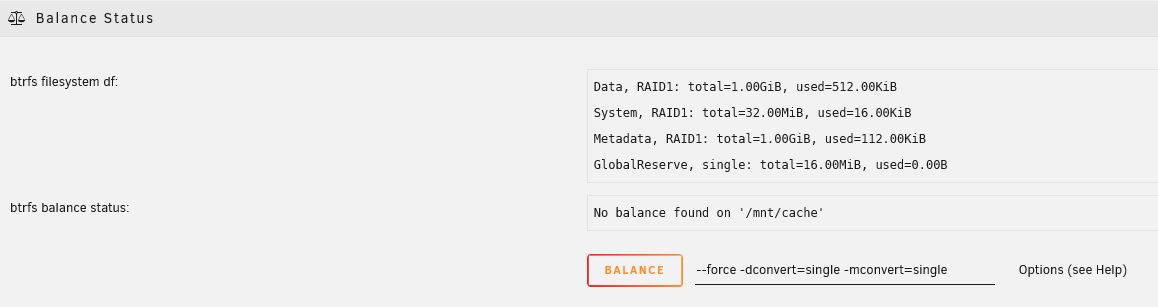
示例:从RAID 1转换到单一配置文件
- 在WebGUI监控进度。
:::note[Timing]
在 cache pool 中更换磁盘是一项重要任务,有助于保持存储系统的性能和可靠性。
:::
如果平衡操作卡住,进行故障排除 - 点击以展开/折叠
如果平衡操作似乎卡住或没有响应,请按照这些步骤进行:
- 在工具 → 日志中过滤
btrfs条目。 - 停止并恢复操作:
- 点击 取消均衡。
- 重启 array。
- 再次启动均衡操作。
- 在池中所有设备上运行SMART测试。有关磁盘健康监测的更多信息,请参阅SMART 报告和磁盘健康。
- 确保池上有至少 10-15% 的可用空间。
- 如果问题仍然存在,在 Unraid 论坛上分享日志。有关捕获诊断信息的指南,请参阅捕获诊断和日志。
有关高级 BTRFS 配置的详细信息,请参阅 BTRFS wiki。
缓存池的最低空闲空间
在 cache pool 中更换磁盘是一项重要任务,有助于保持存储系统的性能和可靠性。
:::note[Prerequisites]
- 检查您的池配置: 确保您的池设置为冗余的 RAID 配置,例如 RAID 1。您可以通过管理界面前往 Main → Pool → Balance Status(适用于 BTRFS)或 ZFS 池状态(适用于 ZFS)来执行此操作。
- **选择合适的替换磁盘:**新磁盘的大小必须与您要替换的磁盘相同或更大。
- **热插拔能力:**如果您的硬件支持热插拔,您不需要关闭系统电源来更换磁盘。
:::
您可以通过点击 主 选项卡中的池名称并转到 个人池设置 来访问最低空闲空间。
- In the Main tab, stop the array (Array Operation → Stop).
- 保护数据: 为每个存储池分配不同的 RAID 级别或文件系统,以实现定制化的冗余和备份选项。
- 隔离工作负载: 将关键应用程序放在更快的冗余存储池中,将大容量数据存储在更具成本效益的设备上。
- 灵活管理: 你可以独立地扩展、减少或格式化存储池而不影响其他池。
- 将新磁盘分配到之前的槽位。
- 启动 array。
- 在WebGUI中监控重建进度。
:::important[Timing]
如果您常常下载大约 10GB 的文件,则将最低空闲空间设置为至少 10GB,最好是 20GB 以便调整。
:::
缓存池的最低空闲空间
Setting a minimum free space for your cache pool can provide better control over file placement, especially when dealing with large files like high-resolution videos. This setting helps Unraid know when to stop writing to the pool and start writing directly to the larger storage array, avoiding interruptions or data corruption.
:::tip[Example]
Unraid 不允许通过 WebGUI 直接在存储池间移动文件,但可以使用 Mover 工具或通过命令行实现。
:::
如果任何文件属于 Docker 容器和/或 VM ,必须禁用这些服务,以便文件可以成功移动。
原理
- 当您将文件传输到包含池的共享时,Unraid 将遵循遇到的第一个最低空闲空间设置 (无论是共享的最低空闲空间还是池的最低空闲空间,哪个先达到) 。
- 最低可用空间设置告诉 Unraid,当可用空间降到此数量以下时,将停止使用 cache pool。
- 如果您的共享使用 cache pool 作为主存储,文件会进入池,直到达到最低可用空间,然后直接发送到 array。
- 如果设置为仅使用 cache pool(没有次存储),则不应用此设置。
- 如果设置为仅使用 array 作为 主存储,则文件将直接写入 array。
媒体共享将地板设置为 20GB,这对于该共享中的文件来说是合适的。但是,如果您还在池中使用 VM 并希望留有缓冲空间以防虚拟磁盘增长,则可以将池地板设置为 50GB。这样,在池的空余空间少于 50GB 之后,对媒体共享的任何传输将直接转到阵列。
将最小可用空间设置为您期望的最大文件大小,最好是该大小的两倍。例如,如果您的最大文件是 30 GB,要将最小可用空间设置为 60 GB。
When accessing a user share from multiple pools and array disks, Unraid merges the directory listings in this order:
在池和数组之间移动文件
There are times when you may need to move files between your cache pool and the main array, such as when preparing for maintenance, upgrading hardware, or optimizing performance. This process is also useful for backing up your cache pool before making configuration changes or replacing drives. Unraid provides a built-in tool called Mover to automate this process for user shares.
在使用 Mover 移动文件之前,务必禁用 Docker 和 VM 服务。这可以防止在传输过程中跳过打开的文件。
从池移动到阵列
在执行维护或升级之前,从 cache pool 移动文件到 array 确保您的数据安全。
将文件从池移动到 array:
- 进入设置并关闭 Docker 和 VM 管理器。这样可以防止任何文件被打开,允许 Mover 顺利转移所有内容。
- 在共享标签中,对于要移动的每个共享(如
appdata或system),将主存储设置为源 cache pool,将次级存储设置为 array。将Mover 操作设置为缓存 → 阵列。 - 进入主标签并点击立即移动以将文件从 cache pool 转移到 array。
- 在 Mover 完成后,点击主标签中缓存条目旁边的文件夹图标检查文件是否已移动。
- 一旦所有文件都位于 array 上,您就可以安全地重新打开 Docker 和 VM 服务。
从阵列移动到池
在维护后或添加新的缓存设备以提高性能时将文件移回cache pool。
要从 array 移动文件到一个存储池:
- 进入 设置 并关闭 Docker 和 VM 管理器,以防止任何打开的文件干扰。
- 在 共享 选项卡中,为每个要移动的共享(例如
appdata或system),将 主存储 设置为目标 cache pool 并将 次存储 设置为 array。将 搬家操作 设置为 阵列 → 缓存。 - 进入 主页面 选项卡并点击 立即移动,以开始将文件从 array 移动到 cache pool。
- Mover 完成后,检查文件是否已在 cache pool 上。
- 移动完成后,在 设置 中重新开启 Docker 和 VM 管理器。
- (可选)要设置共享仅使用 cache pool:如果您希望某个共享的所有文件都保持在 cache pool 上,将 主存储 设置为您的 cache pool ,并将 次存储 设置为 无。
为什么文件有时会出现在错误的池或缓存中? - 点击展开/折叠
When you move files between user shares at the Linux level (for example, using mv or within a Docker container), Linux tries to optimize the operation. If both the source and destination appear on the same mount point (/mnt/user), Linux might rename the file instead of moving it. This can result in files remaining on the original disk or pool, even if the share's "Use cache" setting is set to "No."
为确保文件按预期移动,请考虑以下选项:
- 使用 Mover 工具。
- 复制文件然后删除原件。
- 通过网络移动文件。
这些方法有助于防止文件出现在错误的位置。
多个存储池
Unraid allows you to create and manage up to 34 separate storage pools, each with up to 200 devices. Multiple pools give you flexibility to allocate storage for different tasks, improve performance, and customize redundancy based on your needs. Each pool can use a different file system, RAID level, and device type (SSD, HDD, NVMe, etc.).
为何使用多个存储池?
- 优化性能: 为 VMs、Docker 容器、下载或媒体设置单独的存储池可以提高速度并减少冲突。
- 保护数据: 为每个存储池分配不同的 RAID 级别或文件系统,以实现定制化的冗余和备份选项。
- 隔离工作负载: 将关键应用程序放在更快的冗余存储池中,将大容量数据存储在更具成本效益的设备上。
- 灵活管理: 你可以独立地扩展、减少或格式化存储池而不影响其他池。
常见使用案例
| 使用场景 | 配置示例 | 好处 |
|---|---|---|
| 高性能 VMs | NVMe SSD池,RAID 1,BTRFS 或 ZFS | 快速 I/O 与冗余 |
| Docker/Appdata 存储 | SSD池,RAID 1,BTRFS 或 ZFS | 快速访问和数据保护 |
| 批量媒体下载 | 大型硬盘池,RAID 0 或单盘,XFS/BTRFS | 高容量但冗余较少 |
| 项目/团队隔离 | 为每个团队/项目设置单独的存储池 | 减少资源冲突 |
| 快照和备份目标 | ZFS池,RAIDZ1/RAIDZ2(多设备) | 支持原生快照和备份 |
When accessing a user share from multiple pools and array disks, Unraid merges the directory listings in this order:
- 分配给共享的存储池
- Array 磁盘(disk1、disk2、...、disk28)
- 其他存储池(按顺序)
在存储池之间移动文件
Unraid 不允许通过 WebGUI 直接在存储池间移动文件,但可以使用 Mover 工具或通过命令行实现。
:::note[Remember]
如果任何文件属于 Docker 容器和/或 VM ,必须禁用这些服务,以便文件可以成功移动。
:::
使用 Mover
- 禁用 Docker 和 VM 服务: 进入设置并关闭 Docker 和 VM 管理器以避免打开的文件。
- 从 pool1 到 array 移动文件(cache → array):
- 将文件从 array 移动到 pool2(array → cache):
- 重新启用 Docker 和 VM 服务(如有需要)。
:::note[Timing]
移动大型数据集可能需要数小时,这取决于文件大小和设备速度。
:::
手动文件传输(高级)
- 如上所述禁用 Docker 和 VM 服务。
- 使用
rsync或mv命令在挂载点之间传输文件(例如,/mnt/pool1/share到/mnt/pool2/share)。 - 在从原始存储池中删除文件之前,请核实这些文件。
- 重新启用 Docker 和 VM 服务。
始终检查文件路径并使用正确的共享名称以防止数据丢失。