What is Unraid?
Unraid is an embedded operating system designed to give you complete control over your hardware. It functions as a robust network-attached storage (NAS) system, an application server, and a host for virtual machines (VMs).
Unraid installs on a USB flash drive and boots from it, loading into a root RAM file system. It uses a modern Linux kernel with updated hardware drivers, allowing it to run on nearly any 64-bit x86_64 system while maintaining a minimal memory footprint. All configuration data for the operating system is stored on the boot drive and loads simultaneously with the operating system.
Unraid features a user-friendly web interface for easy management. It offers basic controls for common tasks and advanced settings for experienced users. While it defaults to settings that suit most people, it also allows customization. This blend of simplicity and flexibility helps you store, protect, share, and enjoy your content effectively.
Unraid's core capabilities lie within three main areas:
Software-defined NAS
Allowing users to share storage capacity over a network efficiently.
Arrays and Parity
Unraid provides a simple and flexible solution for turning any 64-bit capable system into a Network Attached Storage (NAS) device. It can handle a variety of drives, whether they connect through IDE, SATA, or SAS, and supports different drive sizes. This means you can add new drives one at a time as your storage needs grow, without having to reorganize your existing data when you expand your setup.
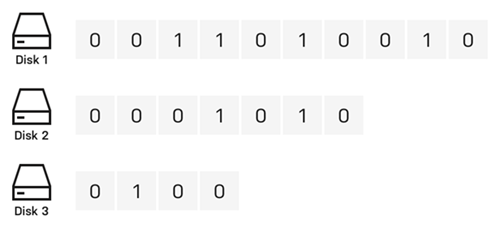
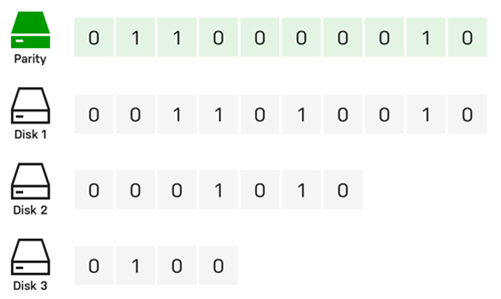
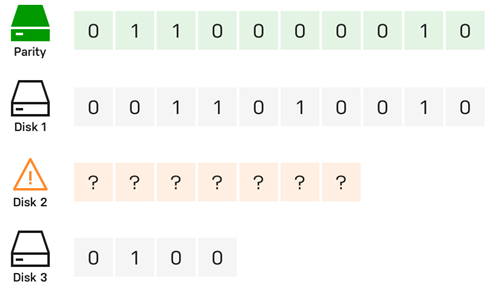
The main job of an Unraid array is to organize and protect the data stored across several drives. It does this by using up to two special drives called parity drives. These parity drives are important because they help reconstruct your data if one of the other drives fails. In fact, with just one parity drive, you can protect all the other drives in your array, keeping your data safe. Plus, you can mix different sized drives and easily expand your storage over time, making Unraid a user-friendly option for anyone looking to manage their data effectively. In Unraid, parity information is updated in real time. To understand how this works, imagine the contents of a hard drive as a long stream of bits, where each bit is either a zero or a one. By summing the nth bit values across all drives and determining whether that sum is even or odd, the corresponding nth parity bit can be set accordingly. If a data drive ever fails, this parity information allows for an accurate determination of the exact bit values, facilitating a precise rebuild on the replacement drive. For example: In the image above, three drives contain streams of bits that vary by device size. These drives are unprotected, so if one fails, data will be lost. To protect against failure, we need a fourth disk as a parity disk, which must be equal to or larger than the largest data disk. To set the parity bits, we find the total for each column. If the sum is even, the parity bit is 0; if odd, the parity bit is 1. Here's the same image as before, but with parity calculated per frame: Let’s assume that drive 2 in our example has failed, and a new drive has been purchased to replace it: To rebuild data on the new disk, we determine the missing bit rather than calculating the parity bit. For column 1, the sum is 0, so the missing bit is 0. For column 6, with a sum of 1, the missing bit is 1. Rebuilding a disk using parity protects against data loss and offers fault tolerance, ensuring full access to the system even if a drive fails.How Parity Works - Click to expand/collapse
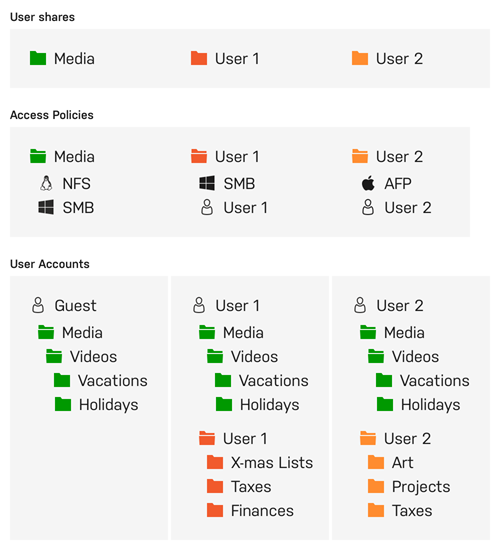
User Shares
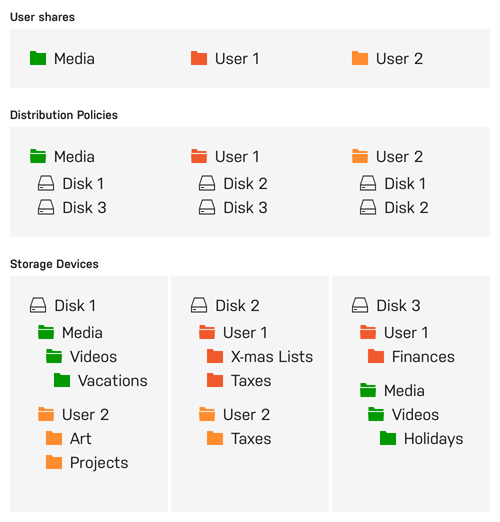
Unraid is different from most RAID systems because it saves data on individual drives instead of combining them into one. As a root user, you can create user shares, which are like top-level folders that gather files from multiple drives in the array or cache pool. This means you don’t have to worry about which specific drive holds your files; they are organized for you.
You can also customize these shares to include or leave out certain drives and decide how files are spread across your storage. Additionally, you can manage how users access the shares by setting up network options, like SMB and NFS, and applying security settings. To keep private data safe, you can create user accounts and set access limits for trusted individuals.
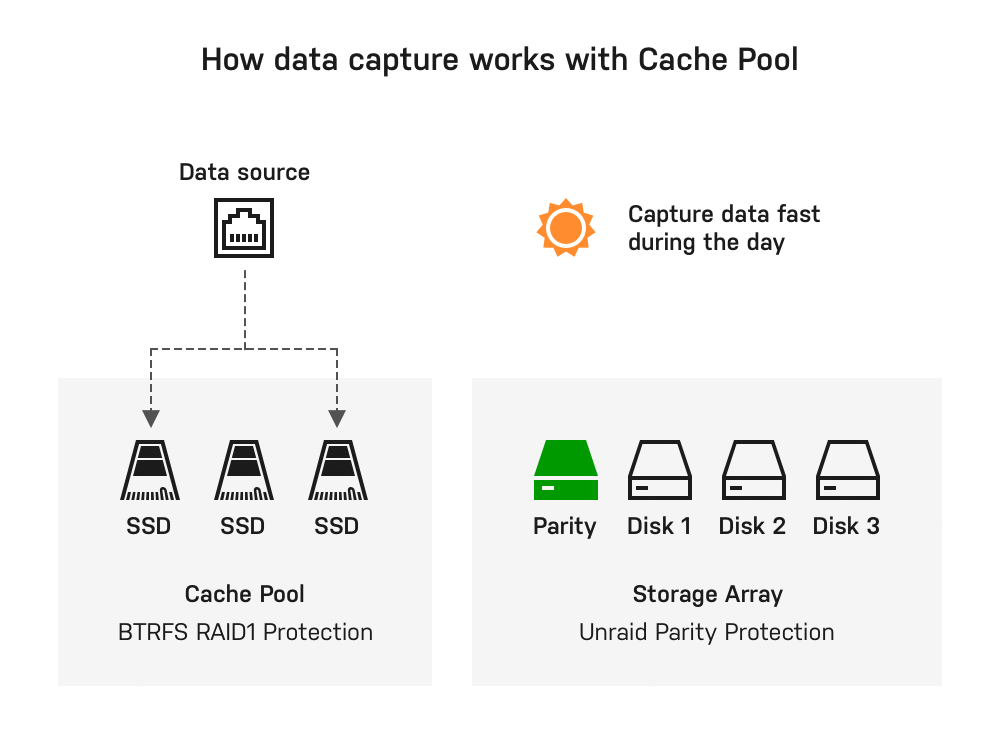
Understanding Cache Drives
One of the standout features of Unraid is the cache drive, which helps speed up data transfer. When you use a cache drive alongside three or more drives, you can write data up to three times faster. When you save files to a user shares with a cache drive, the data is first stored on the cache drive. This allows for quick writing, and later, a process called Mover transfers the data to the main storage array - often during the night—making room on the cache drive.
For added data safety, you can set up a cache pool with multiple drives. This setup not only increases storage space but also uses technologies like ZFS or BTRFS to provide extra protection for your data, similar to RAID 1. Overall, Unraid’s management of shares and cache drives creates a flexible, efficient, and secure storage solution.
Learn more about configuring shares and cache here.
Application Server
Enabling the execution of containerized applications.
Unraid transforms your storage solution into a versatile application server through Docker containerization. This approach overcomes traditional NAS limitations while maintaining system stability and ease of use.
Traditional NAS solutions present three key challenges for application hosting:
- OS compatibility issues - Being unable to run applications designed for different operating systems.
- Complex lifecycle management - Difficult installation experiences can leave residual artifacts after removal.
- Application conflicts - Software components may interfere with each other or system operations.
Unraid's use of Docker addresses these challenges in three key ways:
- OS Independence - Each container runs in its own Linux environment, eliminating compatibility issues with the host operating system.
- Image-based Deployment - Preconfigured application packages allow for one-click installation and complete uninstallation of applications.
- Process Isolation - Containerized applications operate in separate user spaces, preventing any conflicts between software.
Docker containers allow you to run applications in isolated, lightweight environments without the overhead associated with virtual machines. Unraid simplifies the use of Docker by providing access to thousands of pre-configured apps through Docker Hub and Community Applications. This containerized approach enables Unraid users to run multiple applications simultaneously without compatibility issues. It also helps keep the system organized by using self-contained application packages and makes it easy to enhance server capabilities through Docker's ecosystem.
For advanced Docker settings, check out Run Docker Containers.
Virtualization Platform
Running virtual machines with performance close to bare-metal hardware.
Unraid functions as a virtualization host, using a hypervisor to securely allocate resources to virtualized guests. This allows you to run various applications in isolated environments, going beyond just network-attached storage.
To use hardware virtualization in Unraid, ensure your CPU, chipset, BIOS, and device drivers are compatible. A full list of requirements is available in the VM setup guide. If your server doesn't meet these requirements, the VMs menu will be disabled in the Unraid WebGUI.
Benefits of Using Virtual Machines (VMs) - Click to expand/collapse
While Docker containers are popular for Linux-based applications, VMs enhance the flexibility and efficiency of your Unraid server setup and offer distinct advantages on your Unraid server:
-
Isolation: VMs run independently in separate environments, ensuring that the failure of one does not affect the others.
-
Consolidation: Consolidate multiple physical servers into a single Unraid machine, reducing hardware needs and simplifying maintenance.
-
Resource Allocation: Unraid allows you to assign specific CPU, memory, storage, and network resources to each VM, ensuring critical workloads receive necessary resources.
-
Testing and Development: VMs enable easy creation and testing of software across different environments without requiring multiple physical machines.
-
Security: The isolation of VMs enhances security, making it harder for malware to spread between them.
-
Legacy Application Support: VMs let you run legacy applications or operating systems that may not be compatible with modern hardware.
-
Resource Isolation: Each VM can have dedicated resources, preventing performance issues across VMs.
-
Resource Overcommitment: You can run more VMs than the physical resources would typically allow, understanding that not all will fully utilize their allocations at the same time.
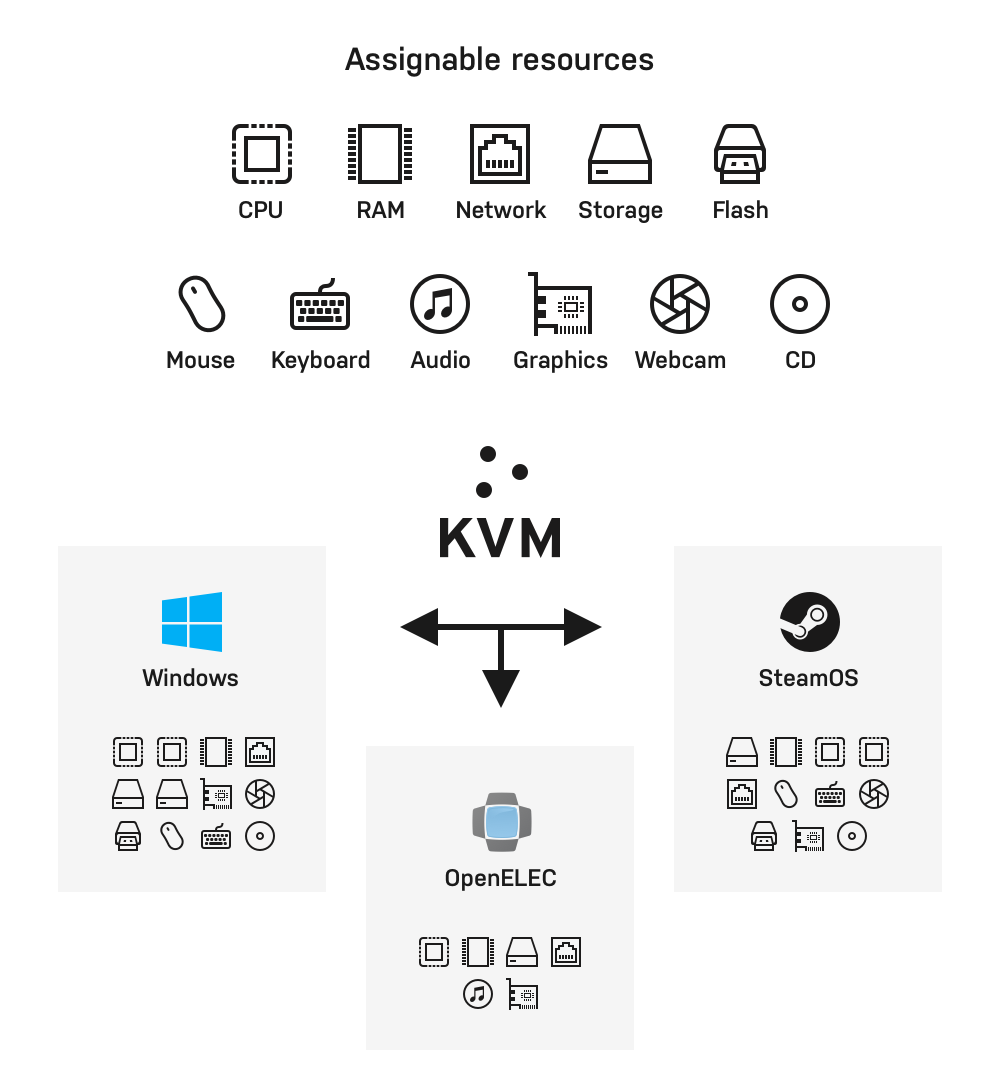
Assignable Device Support for Virtualization - Click to expand/collapse
Unraid's KVM-based virtualization uses modern tools for flexible hardware assignment while maintaining host stability.
Key components include:
Core Technologies
- QEMU and libvirt: Manage VM lifecycles.
- VFIO device passthrough: Provides direct hardware access.
- VirtIO and VirtFS: Optimize storage and network performance.
- OVMF: Supports UEFI and Secure Boot.
Assigned Resources
- Compute: Dedicated CPU cores through CPU pinning.
- Memory: Isolated RAM.
- Storage: SSD-optimized virtual disks via VirtIO.
- Peripherals: Full PCI/USB device passthrough, including GPU passthrough support.
Platform Flexibility
- Supports i440fx and Q35 machine types.
- Compatible with Xen HVM and Xen PV workloads.
- Enables Intel VT-x and AMD-V hardware virtualization.
For VM setup steps, check out Create virtual machines.
GPU passthrough requires compatible hardware (see VM setup).